
 At some point you’ve walked out to the bike, turned the key, thumbed the starter button, only to be met with the dreaded “click click click” of a dead battery. I actually went through this several times before I started the blog last year, but that was before I kept photographic evidence of my maintenance habits. A while back, a buddy sent me a text, asking for a quick run-down on the best way to replace the battery on his ride. He has one of Lola’s sisters, the Triumph America, so I only felt it right to head over there and give him a hand.
For experienced folks, a detailed narrative on changing a battery is probably a snooze, but I figured it would be a service to the Triumph masses to offer up a few photos and whatnot because there are a couple nuances to the Triumph cruisers. On the flip side, for folks that want to save a couple bucks, changing a battery comes right after adjusting a chain as far as “entry level” Do-It-Yourself Moto-Maintenance.
For whatever reason, Triumph decided to hang the battery off the left side of the America and Speedmaster models, instead of under the seat like the Bonneville (I suspect that helped make the seat lower?). At the same time, Triumph covered up the battery terminals with not one, but four covers. While installing my heated grips a couple years back I got a crash course in what it means to get a battery out of its cozy cradle.
There are a couple ways to skin this cat. Provided the battery is actually dead (i.e. you have proven it’s not the “alternator” and it won’t hold a charge), I’m of the mindset it makes the most sense to remove the battery, toss it in the trunk (riding in a car… snooze), and go find a suitable replacement battery. You can also stop by a local dealer and take home a new battery on your way home from work. There are perks to both ways, but I’ll come back to that.
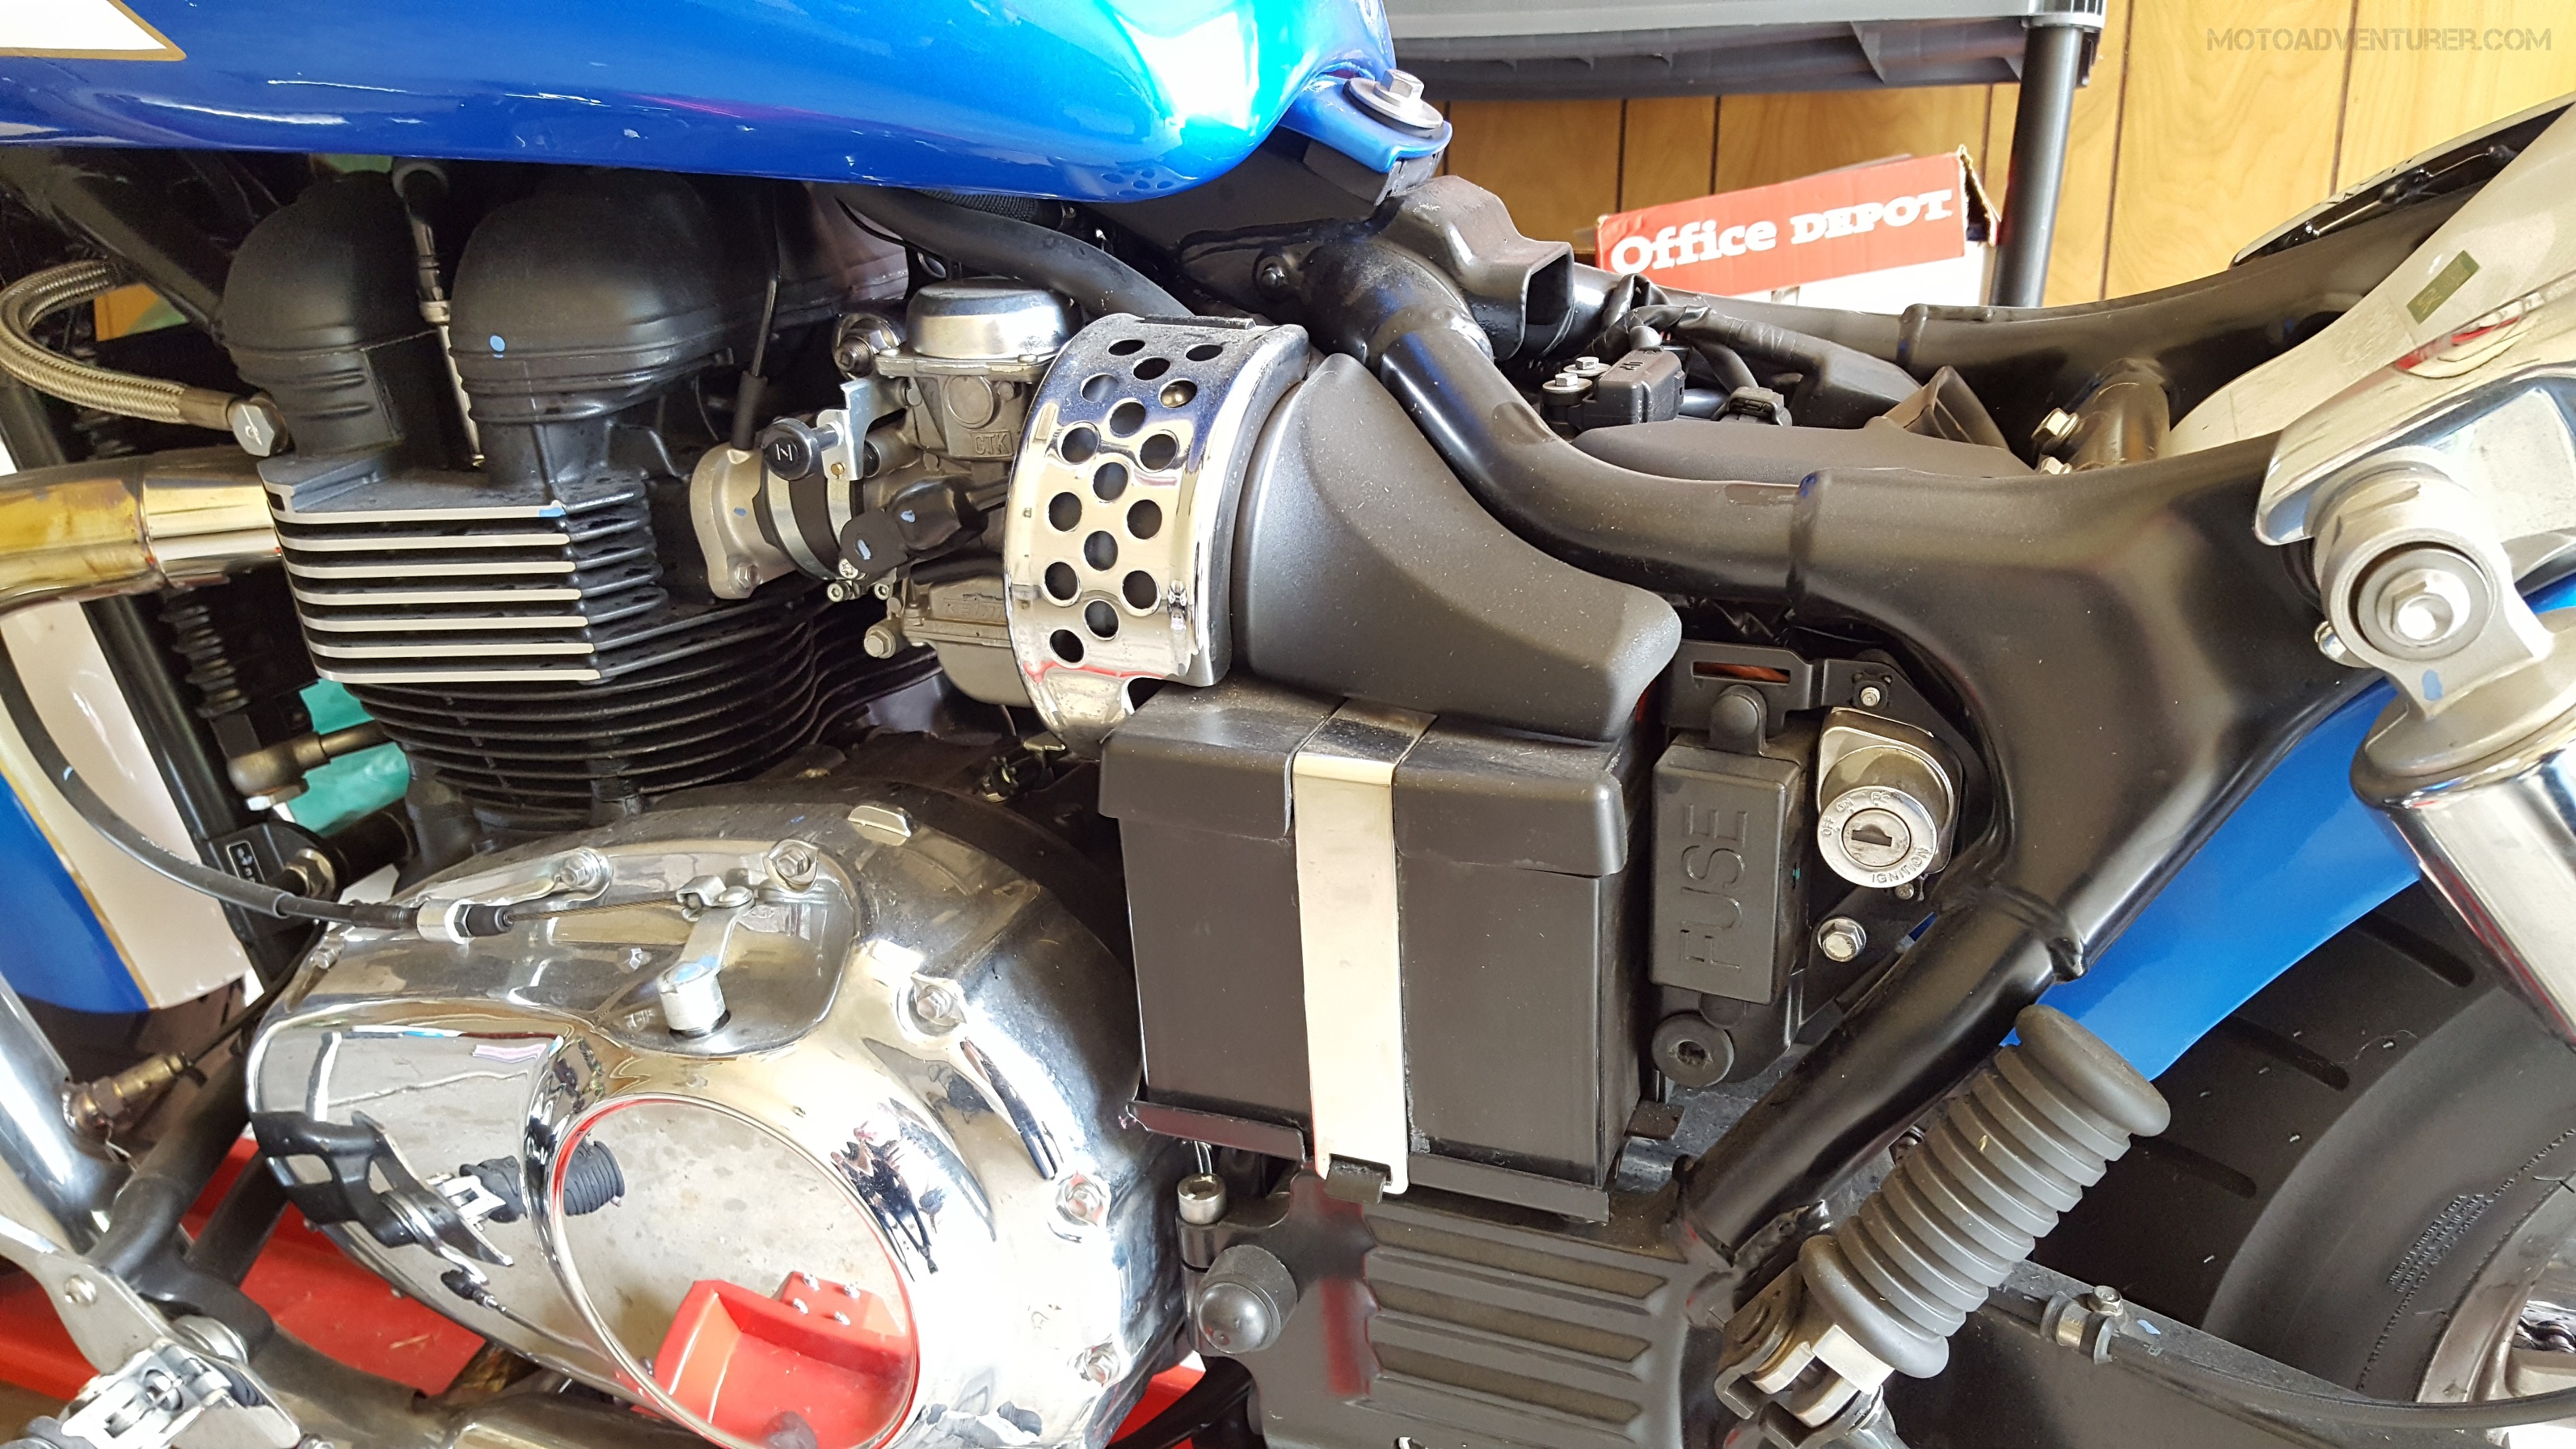 Getting started I recommend taking off the seat, you don’t really need to, but it’s one bolt, and it’s easy. For folks unfamiliar, underneath the fuse/ignition cover there’s a hex-key that can disassemble half of your Triumph. To remove the ignition cover, gently pull the bottom of the cover toward you. The cover it held in place by a knobbed post and rubber grommet on the bottom and a tab and slot on the top.
 I say “gently” with emphasis, I broke my first one pulling it from the top, not realizing it pulls loose from the bottom ($14… it wouldn’t hurt to have a replacement on hand, more on that later). As I mentioned, on the back side of the cover you’ll find a hex key that fits most of the button head screws on the bike. Use the hex key to remove the retaining bolt on the rear fender that holds the seat down. With the bolt removed there is a pull string hiding on the bottom side of the seat the releases the seat lock so you can pull up on the seat. The tongue of the seat sits just under the gas tank, so pull slightly up and out to remove the seat.
With the seat out of the way you need to remove the “faux” carb intake cover. With that same hex key, you need to remove the button head screw on the bottom of the chrome cover. The cover also has a tab and slot mounting arrangement, so lift up gently to remove. If you like to keep your chrome shiny, I recommend setting these covers aside in a bin or on a soft cloth. This is also a good time to shine them up; some of the surfaces are tough to get to when they’re on the bike. With the chrome cover removed, there’s an additional plastic cover that needs to be removed to get access to the battery “strap”.
 This cover has two button head screws on the left side that were concealed by the chrome cover. Once removed, there is also a post and grommet attachment on the right side above the battery. Like the ignition cover, a firm but delicate pull should pop that cover off the bike and expose the battery retainer (“strap”).
 With the last faux-carb cover out of the way, dig around in your tool box for the dreaded “Torx” wrench. I suspect it is a T27 or T30 Torx bit, but since I don’t have one, I don’t actually know. I have (thus far) successfully applied the proper force and torque with a conveniently sized screw driver and removed the battery without stripping the Torx screw. Why manufacturers insist on having three and four different types of fasteners is still beyond me, especially for something as “routine” as changing a battery. At any rate, once you’ve backed out that Torx head screw, you can remove the chrome “strap” and subsequent black plastic battery cover.
 Completely uncovered, from here you can jostle the battery part way out of its cradle to remove the leads. A couple of Philips screws (or 10mm socket) and you’re home free. Be advised, by what seems to be “manufacturer standard operating procedure”, the positive (red) battery lead is just barely long enough to reach the battery once you start to remove it from the cradle. If you have big plans of installing any other electrical bits, it’s going to be a bear to get the battery settled back into the cradle.
 That said, this is probably an ideal time to install a pigtail for a battery tender since you’ve already got the battery out of the way. My buddy and I both experienced what I consider premature battery failure because they weren’t properly maintained while the bikes sat idle. Considering my car sits outside all winter and runs just fine, I never thought about keeping the bike on a tender year-round; I’ve been harshly converted after spending $100 on a new battery. Fully charged motorcycle batteries are happy batteries.
At any rate, if you decide to hook up a battery tender or a fused electrical junction box etc., as I mentioned, this is a prime time for that. You’ll also need to remove an EFI sensor and cover that are next to the air intake (under the seat) to make space for additional wires etc. I have my heated grips and battery tender both wired in and tucked in under the seat. If you’re tackling this task, you’ll need to disconnect an EFI sensor to remove the cover; make sure you have the bike ignition off before messing with any of the EFI connections. If the ECU is on and a sensor is unplugged the bike will throw a check engine light for three engine heat cycles until the sensor is “replaced” (the bike must be cold, then up to operating temperature and cold again three times).
Regarding battery selection, as I said, I prefer to take the old battery with me and go shopping. When I replaced my old battery, I found a compatible Duracell battery with increased cold crank amps (those come in handy during the winter). That wonderful Duracell battery was not only just a hair larger than the stock cell, but it was also gray instead of black. If you hadn’t noticed before now, the outside of the battery is exposed to the elements, a gray battery on my flat black ride was less than ideal. I dealt with it for a few and found a cheap piece of black automotive vinyl on amazon; problem solved. As I said, there are perks to each method (shop vs. buying from the dealer), the dealer will probably get you a black replacement that you know will fit; that said, I did have a little trouble getting the new battery settled into its harness, I suspect there was still a subtle size difference between the factory original and the OEM replacement.
 Depending on where you get a battery it may or may not be fully charged. In this case, the OEM recommended battery requires installation of the electrolytes and charging before you can get back on the road. It would behoove of you to get a replacement battery on hand, pour in the electrolytes, and then charge the battery overnight if you decide to go this route. That route was the way I went with my scooter way back when, but when Lola’s battery gave up the ghost, the place I bought the battery from actually pre-charged the Duracell I bought so I was back on the road the same day; just one more thing to keep in mind.
At any rate, with a fully charged new battery back in place, the covers obviously go back on in reverse order. I’ve spent significant amounts of time, not only on my bike, but also on my buddy’s bike getting the battery to sit properly in its home. Based on the warping I’ve seen on the backside of the original battery, I suspect the plastic “gives” a bit overtime; you just have to fuss with all the short cables and fight the screw back into place. Once all the covers are reinstalled and the seat’s back on, you can put that trusty hex key back in its home behind the ignition cover. As I mentioned earlier, be careful removing and reinstalling that hex key, after a while the plastic “keepers” wear out and the hex key won’t stay on the cover anymore.

Useful post – at least the battery is generally accessible on Triumphs – it is a tank off job for the Monster 696 😦
LikeLiked by 1 person
I heard that. That’s not fun at all!
LikeLike
Very helpful post, thank you. However last year I broke the pull ring for the seat, I was hoping to use long nose pliers to get it to unlatched but I cannot seem to find the wire. Any thoughts on how to get the seat off or find the latch wire
Rob
LikeLiked by 1 person
Hey Rob, sorry for the delay, I needed to look back through my photos. Somehow I’ve successfully cropped the retaining “stud” out of all the photos. I’ll have to check through the originals on my portable hard drive see if I have a good photo stashed away. At any rate, the question in my mind is how the retaining stud is mounted to the rear fender. If it’s threaded from the underside you may be able to “un-bolt” it, but I admit I’m not positive that will work either. You may be forced to “pry” the seat off the bike and repair the retaining mechanism afterword. I’m betting if you “peel” up the back of the seat a shade, then insert a towel under the gap, I’m betting you can pry it up a bit further until you see what’s left of the “pull string” and grab it with a set of pliers. That may be a two-man job. Unfortunately that’s the best I can offer at the moment. Had my buddy not just moved to Boston I’d ask him to shoot me a few photos for us. If I root around on Instagram and whatnot I may be able to scare up some other folks with photos.
LikeLike
Not at all, I have the bolt off the rear fender and I will try and pry it up from the back as you suggest. Thanks for getting back to me, Cheers
LikeLiked by 1 person
Great post, but I still have a question in case anybody still checks on this…
Anyway, I was changing out the battery on my Speedmaster the other day and was struggling with a stripped screw holding the grounding wire onto the negative terminal of the battery. I had to pull the battery a little further out in order to get at the screw with my pliers. Now, the grounding wire splits off in two directions, and the smaller wire came unplugged when I pulled the battery out, and I can’t figure out where it needs to get plugged back in. I truly don’t want to have to get a mechanic out to my bike for what is probably an easy fix, but I can’t seem to find a schematic or diagram to show me where to plug in this wire. Any help would be greatly appreciated!
LikeLiked by 1 person
Hey Matt! Unfortunately I sold my Speedmaster, so I won’t be able to go out to the bike and check. However, I have a lot of photos, let me look through my pictures this evening and see if I can find what it’s connected to.
Also his may sound dumb, but in the meantime I would look up #TriumphSpeedmaster on Instagram, there’s a great motorcycle community there, many of those guys work on their bikes quite a bit.
LikeLike
Matt, I looked back through my photos, I’ve been unable to pin down where the leads go. However, I did pull out my Haynes manual and snap this photo (https://motoadventurer.files.wordpress.com/2017/06/triumph-speedmaster-wiring-diagram-motoadvr.jpg). Looks to me like it goes to the starter relay and the fuse box. I’d check those locations.
LikeLike
Thanks for this, old wrench but new to Hinkley Triumphs, very helpful thank you.
LikeLiked by 1 person
Glad I could help out Kevin!
LikeLike
This is such a precise and easy explanation! Thank you!
LikeLike