
 It’s been a while since I did an in-depth update on the status of Rosie the Scrambler. Things have fell by the wayside considering my workload at the “day job”, trying to document the Dirtster Project, and getting ready for rallies this spring. Per my previous comments about “rally planning”, I have some lofty goals, but I have finally accomplished most of the short term items, with a few wild cards on the horizon.
Left Side Pannier
I’ve actually received a myriad of questions about my pannier mount set up and I apologize that I’ve not published anything about it before now.  Last spring I was desperately trying to add storage space to the Scrambler without breaking the bank. I found a company called Precision Motorcycle Racks that sells pannier racks for the Triumph Bonneville line individually; this is important as I only needed a left side rack. The rack was cheap, like $50, so I was somewhat concerned about the hardiness of the construction. The pannier rack bolts onto the existing stud for the top of the shock mount and includes a bracket to secure to the back of the left passenger peg. With the rack installed, I beat on it pretty hard to see how sturdy it was; considering the price, I was impressed with the quality (more on that in a minute).
 With the rack in place, it was a matter of selecting a suitable pannier to hang on it. Originally I had plans to sling a cheap ammo can off the side. I admit, I still want to do that, but considering the price, weight, capacity, and concern about sturdiness, I decided to pick up a waterproof softbag instead. The soft-bag also offers the option to mount it on the pillion seat if I didn’t want to use the pannier rack, something the ammo can doesn’t do as easily. Ultimately I selected the Kriega OS-18 dry bag as the pannier of choice. Long term I want to get a matching set of Kriega bags for both the left and right sides, so I figured having an extra compatible bag would be a good start.
 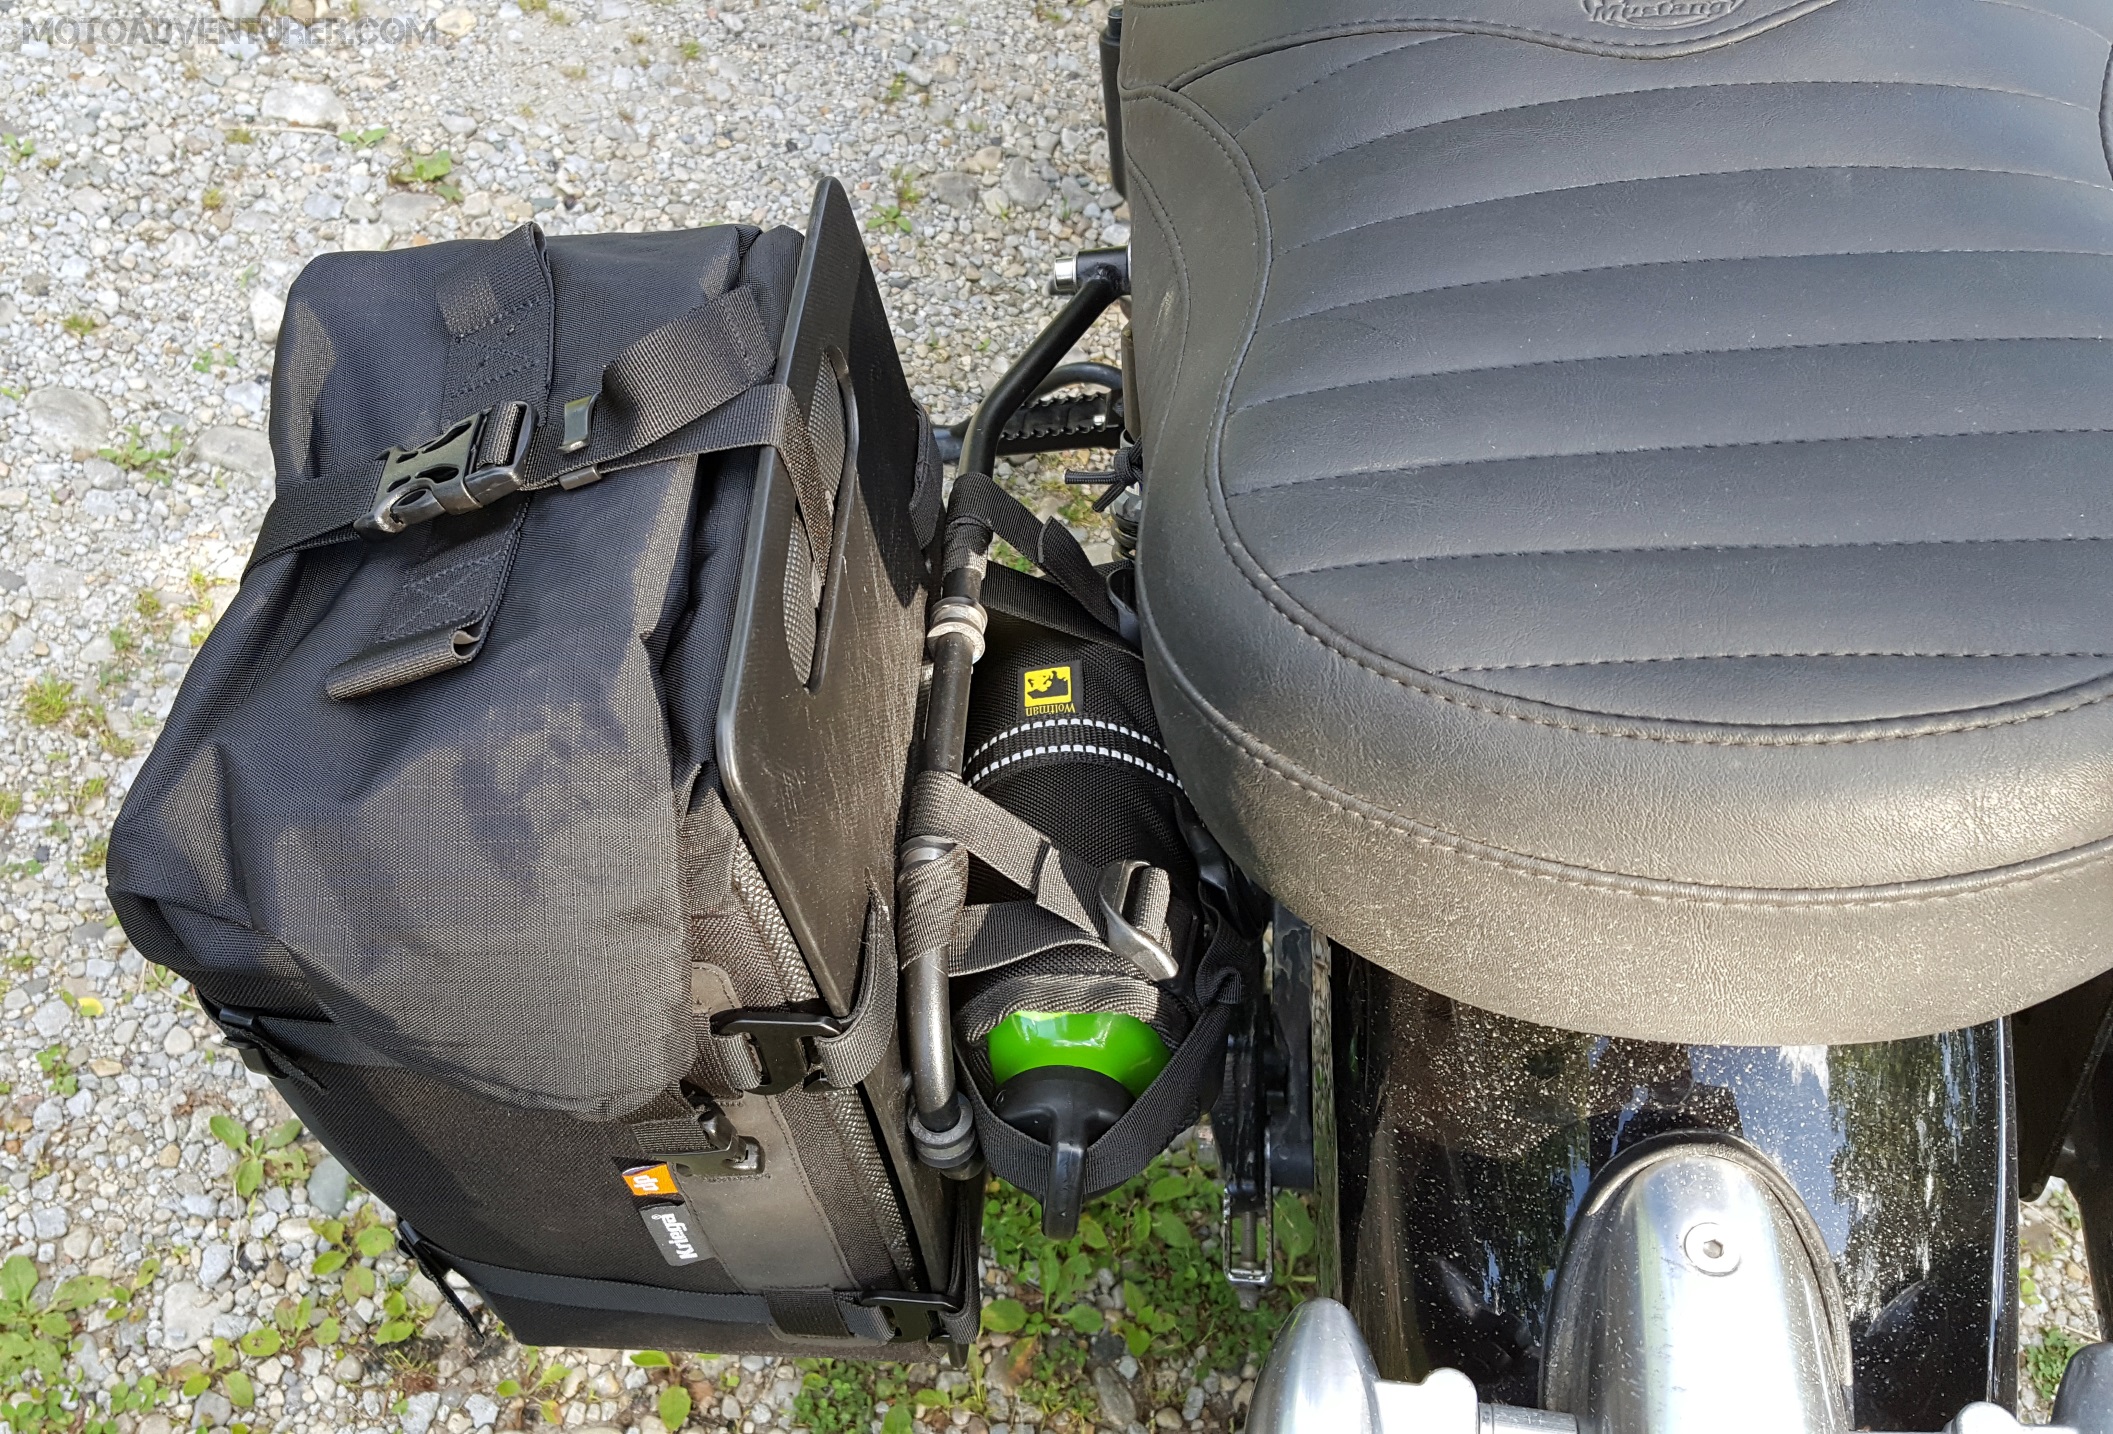 Kriega does sell a mating attachment “board” that can be fitted to your luggage rack. I’m cheap, so despite getting better hardware, $75 seemed like a lot to spend on a plastic plate and some screws. Instead, I pulled an old cutting board out of a drawer in the kitchen and went to work with a “speed-saw” (like a drill bit, but used for lateral cuts). I cut slots in the cutting board to match the attachment straps on the bag, and then drilled holes to align with half-inch-diameter “Adel” clamps (cushioned wire clamps) I used to mount the board on the pannier rack. I painted the board black and bought 5 screws and nylon lock-nuts at the hardware store to mount the board to the clamps. Now the dry bag can fastened to the pannier rack when I want it, or I can ride “blank” when I don’t need the extra storage.
Noticing the space between the rack and the rear fender, I realized I could mount a fuel bottle on the backside of the rack.  At one point I had a Wolfman canvas fuel bottle holder and a 3” tool tube mounted behind the rack, but when I relocated the brake caliper, I had to make room (more on that later). This whole setup has worked really well, and has all been accomplished under $200, something that’s hard to say for modern motorcycle luggage systems. That said, I admit I want to improve on the setup. When scrambling the highly technical stuff, I want to ride “lighter”, however I still need tools in case of a breakdown or flat tire, along with rain gear depending on the conditions. Because of this, I would like to beef up the rack a little bit and make it possible to mount more tool tubes to the rack when I’m not using the pannier. That will probably mean making an investment in a slightly more robust rack, and likely a larger mounting surface; but for now this is getting the job done.
Tool Tube
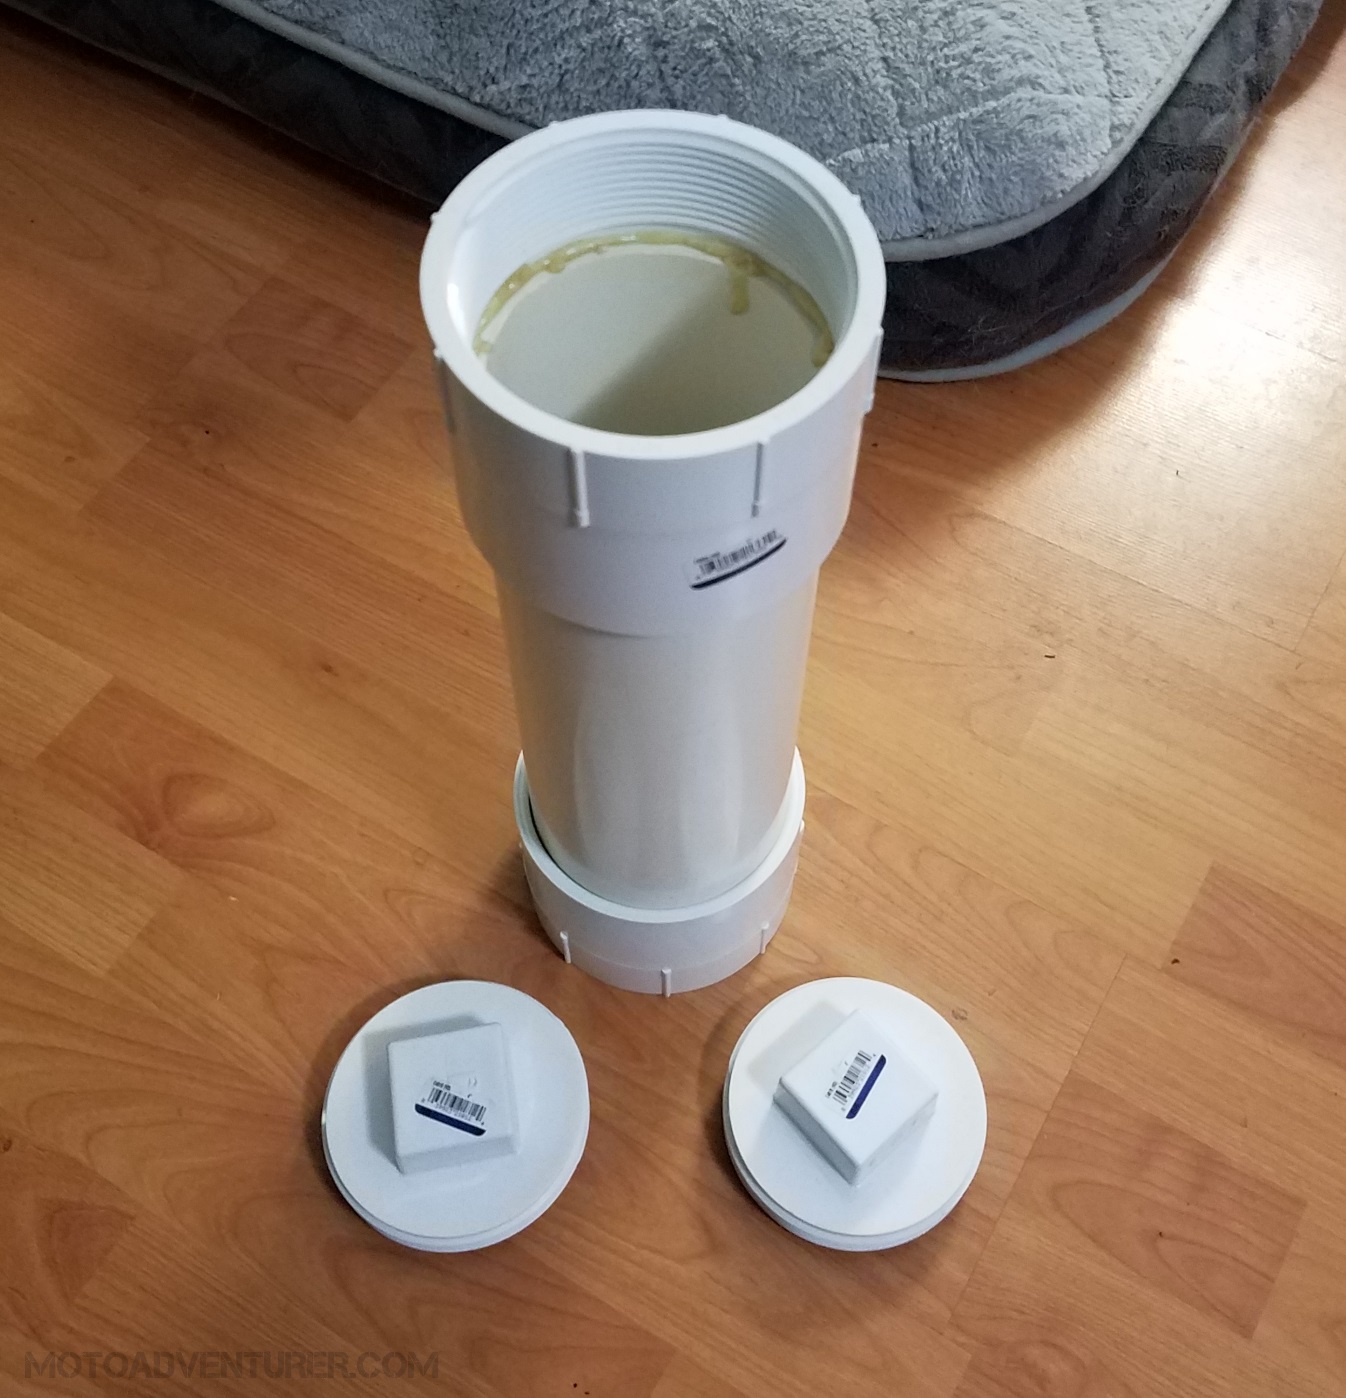
While I admit touring solo was an early driver for upgrading the tool kit, riding off-road has really hardened that stance. That task gets a little tricky as I want to carry the weight closer to the center of gravity, and certainly not on the left side pannier as the tools are a bit heavy. I’ll accept that a light tool kit might be more advisable, but per usual, I’m taking on a lot of different scenarios with one weapon; sacrifices are being made. At any rate, traditional tool tubes will set you back about $15, and with enough space, you can bolt up two or three of them and accomplish the same task. Real-estate obviously comes at a premium on the Scrambler, so I needed a better waterproof solution. Ultimately I dropped by the hardware store and started looking at 4” PVC pipe.  I bought a 3 foot section of 4” pipe, two threaded ends and 2 threaded caps to seal the deal. I used a coping saw to cut the main pipe down to a reasonable length to fit on the pillion seat (or luggage rack), and used gorilla glue to fasten the end caps (you can also use PVC cement). Now with a hideous piece of $30 white plastic fastened to the back of the bike, I lathered it in all of the motorcycle stickers I had laying around and now I’m all set for the road. The new tool tube holds all the normal tools I use to work on the Scrambler, with exception of my multi-meter and air compressor.
E-tool Shovel Mount
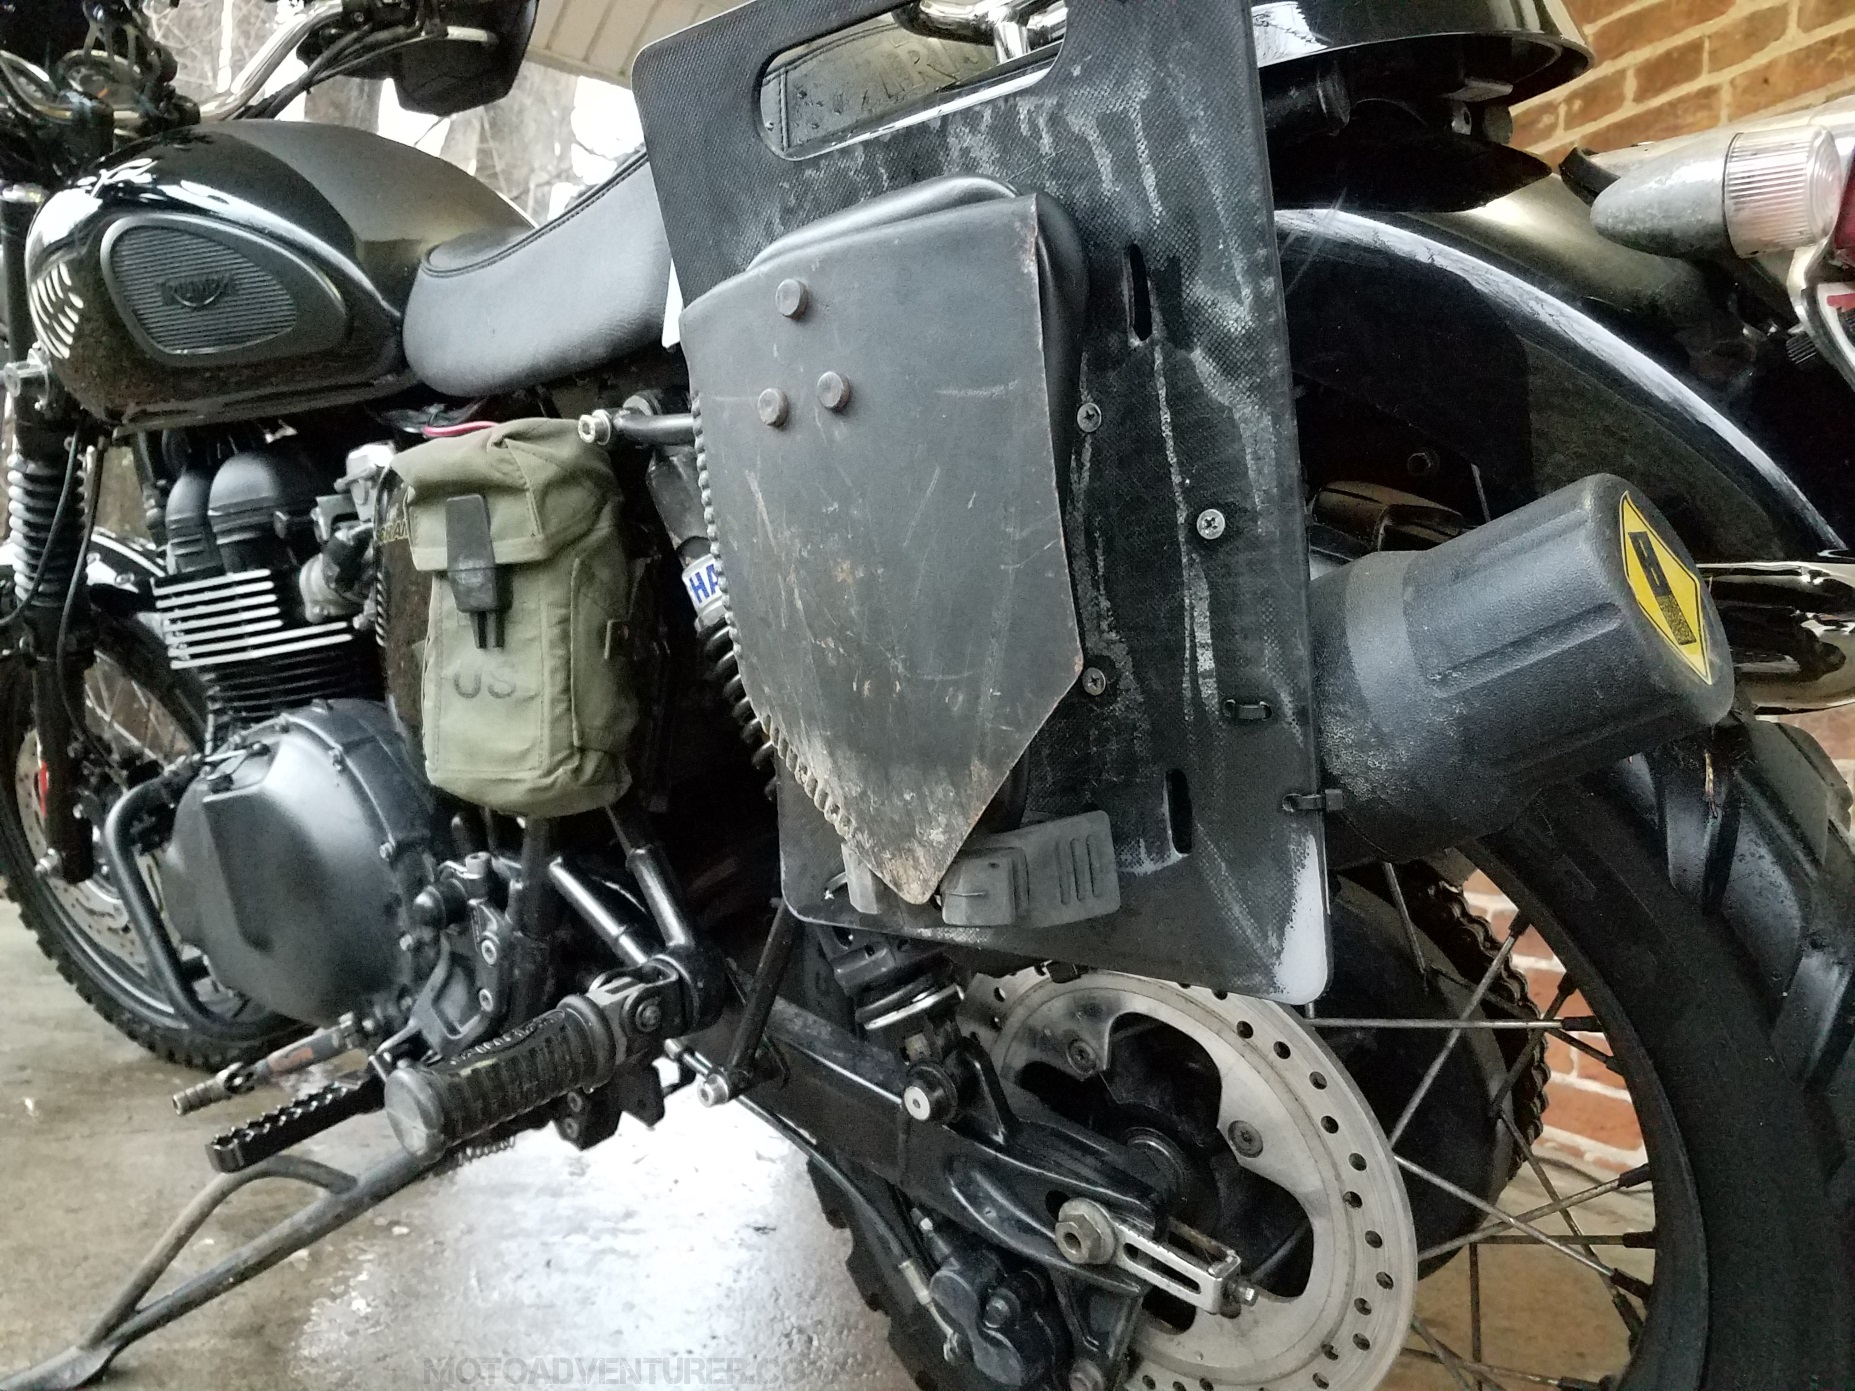 I talked about this in the lead up to all of these upgrades; it doesn’t necessarily make a whole lot of sense, but I want the option to have my entrenchment tool on the trail. Thanks to a Christmas gift from a friend, I now have the ability to mount my trusty “Army field shovel” to the side of the bike. It may not get used a whole lot… but if nothing else, it will certainly be a conversation piece. This mount is really simple, I saw the setup that Ural is using on their sidecars, and did the same. Considering that the mounts were a gift ($15 on grainer or amazon), I drilled a couple holes and spent a couple bucks on screws and nylon lock-nuts; done deal.
Rear Brake Relocation
This was arguably the most important modification I wanted to make before I dove too deep into off-road riding. For about $100, per my comments, you can buy a bracket from various outlets; ultimately I chose the Motone bracket. Mounting the bracket itself is actually quite easy; I frequently remove the rear caliper prior to removing the rear wheel of the bike, so I’m quite familiar with manipulating the caliper mounting bracket. The brake line however is another story.  Per my comments about fussing with the California Emissions Canister, there are challenges in finding the best routing method. I actually rode the bike for a couple days with the caliper relocated and the break line riding between the charcoal canister and the swing arm, but I just wasn’t happy with the tight quarters so I decided to remove the canister. With the canister removed, the route is pretty obvious; the brake line makes a 90° bend from the brake master cylinder, under the swingarm, through the inside of the swingarm, then up to the top of the brake caliper. I admit, I’m still a little unhappy with the existing path of the brake line. I recognize the likelihood of something hitting or “slicing” the brake line between the wheel and the swing arm isn’t particularly high; however something about it just seems like a bad plan. Ultimately I suspect I will go visit Spiegler Performance and have a custom brake line made to fit the path better (~$100 or less I assume). Perhaps I’ll spend the extra $65 and upgrade the front at the same time; maybe leave a little extra room for a 30mm travel upgrade and taller par risers.
Spiegler Banjo Bleeder Bolt
If installing the brake caliper relocation bracket wasn’t challenging enough, no thanks to the brake line constraints, bleeding the brakes after disconnecting the brake line was worse. With the brake caliper now relocated to the top of the swing arm, the stock bleeder valve was no longer the highest point of the brake system. I’d put a $25 “Bleeder Banjo Bolt” on my Scrambler project Pinterest board a long time ago, so I stopped into Spiegler to pick one up after work one day. Installation is a simple bolt replacement, you just need to make sure you torque the banjo bolt to spec and take it easy on the bleeder bolt; after that it’s business as usual.


17 Tooth Front Sprocket
Similar to relocation of the rear brake, I was pretty convinced I needed to shift the gearing a little lower for the nasty off-road challenges. I stand firm that the Scrambler is a tractor, but it’s still a street oriented piece of agricultural equipment; the torque band is down low, but I think first gear could still stand to be a bit lower after slipping the clutch up Pumpkin Hollow Road a few months ago. Installing the 17T primary sprocket was easy. When I had a feeling the last of the winter salt was finally washed off the roads in late February, I decided it was time to replace the chain (big assumption on my part, snow is somehow still in the forecast here this week…). Considering the chain was already coming off, I took that as a window to swap out the stock 18T sprocket for the 17T. Normally I would buy a chain and sprocket kit when replacing the chain, but in this case, I figured the rear sprocket was virtually unworn, so I was just going to replace a chain and sub in front new front sprocket.
How the bike feels is a much larger issue than installation; thousands of miles later, I’m still on the fence. 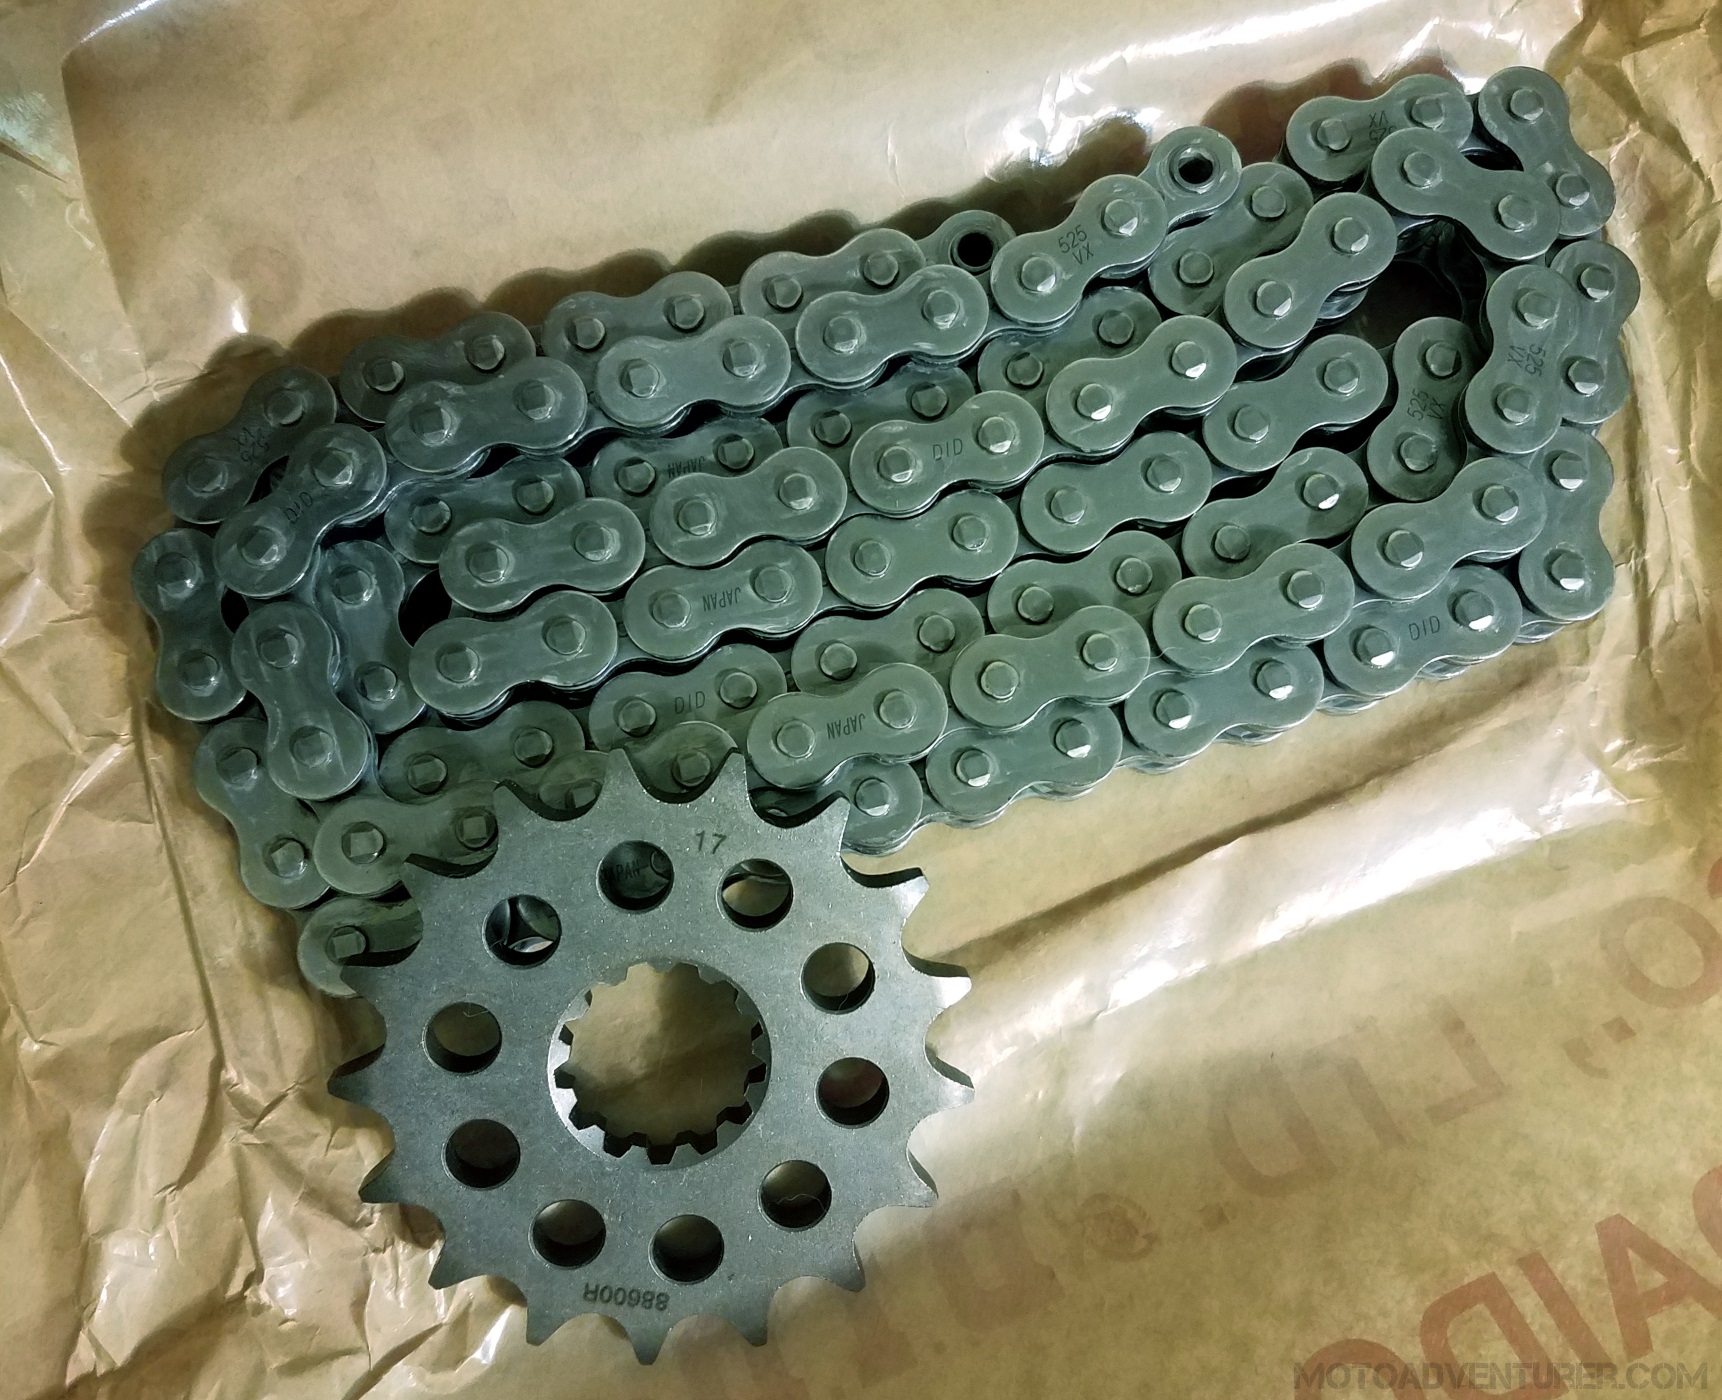 The 17 tooth sprocket makes the bike wind through the gears much smoother and much more quickly than the 18T. The bike “feels” a lot faster and acceleration “seems faster” on the odometer. Dropping to a 17T sprocket, I expected that the bike would potentially loft the front wheel, but that doesn’t seem to be the case, but it certainly does feel like it will get to “The Ton” a lot faster. Much of this is speculation as a result of the current state of tune of the “Butt Dyno”; also, I can empirically tell you that the speedometer is now 5 MPH slow when traveling at 80 MPH (Speedo indicated versus GPS measured). On the same note, “Cruising” in a 70 MPH zone now means that the engine is turning between 4500-5000 RPMS depending on grade and actual speed. Trying to stay ahead of interstate traffic on the way to March Moto Madness through Kentucky was pretty brutal; 5000 RPMs for hours on end was really draining.
With the 17 tooth front sprocket, the bike is an absolute gas in the twisties. The gearing just feels right, and the bike wants to squirt out of the corners. The off-road performance feels equally better. I admit I’ve not been in an excessive amount of mud since the change, but the gearing has worked very well for creek crossings and steep hills. Despite how awesome the bike has been from 0-65 mph; the buzziness at interstate commuting speeds is taxing. As a result, I’ve just re-installed the 18T sprocket. Despite being partially worn, I’ve ordered extra lock-washers so I can switch back and forth between the 17 and 18 tooth sprockets between on-road and off-road events; I definitely want to make sure I have it installed for Conserve The Ride in June, despite the 600 mile journey it will be to Pennsylvania.
Skid Plate Extension
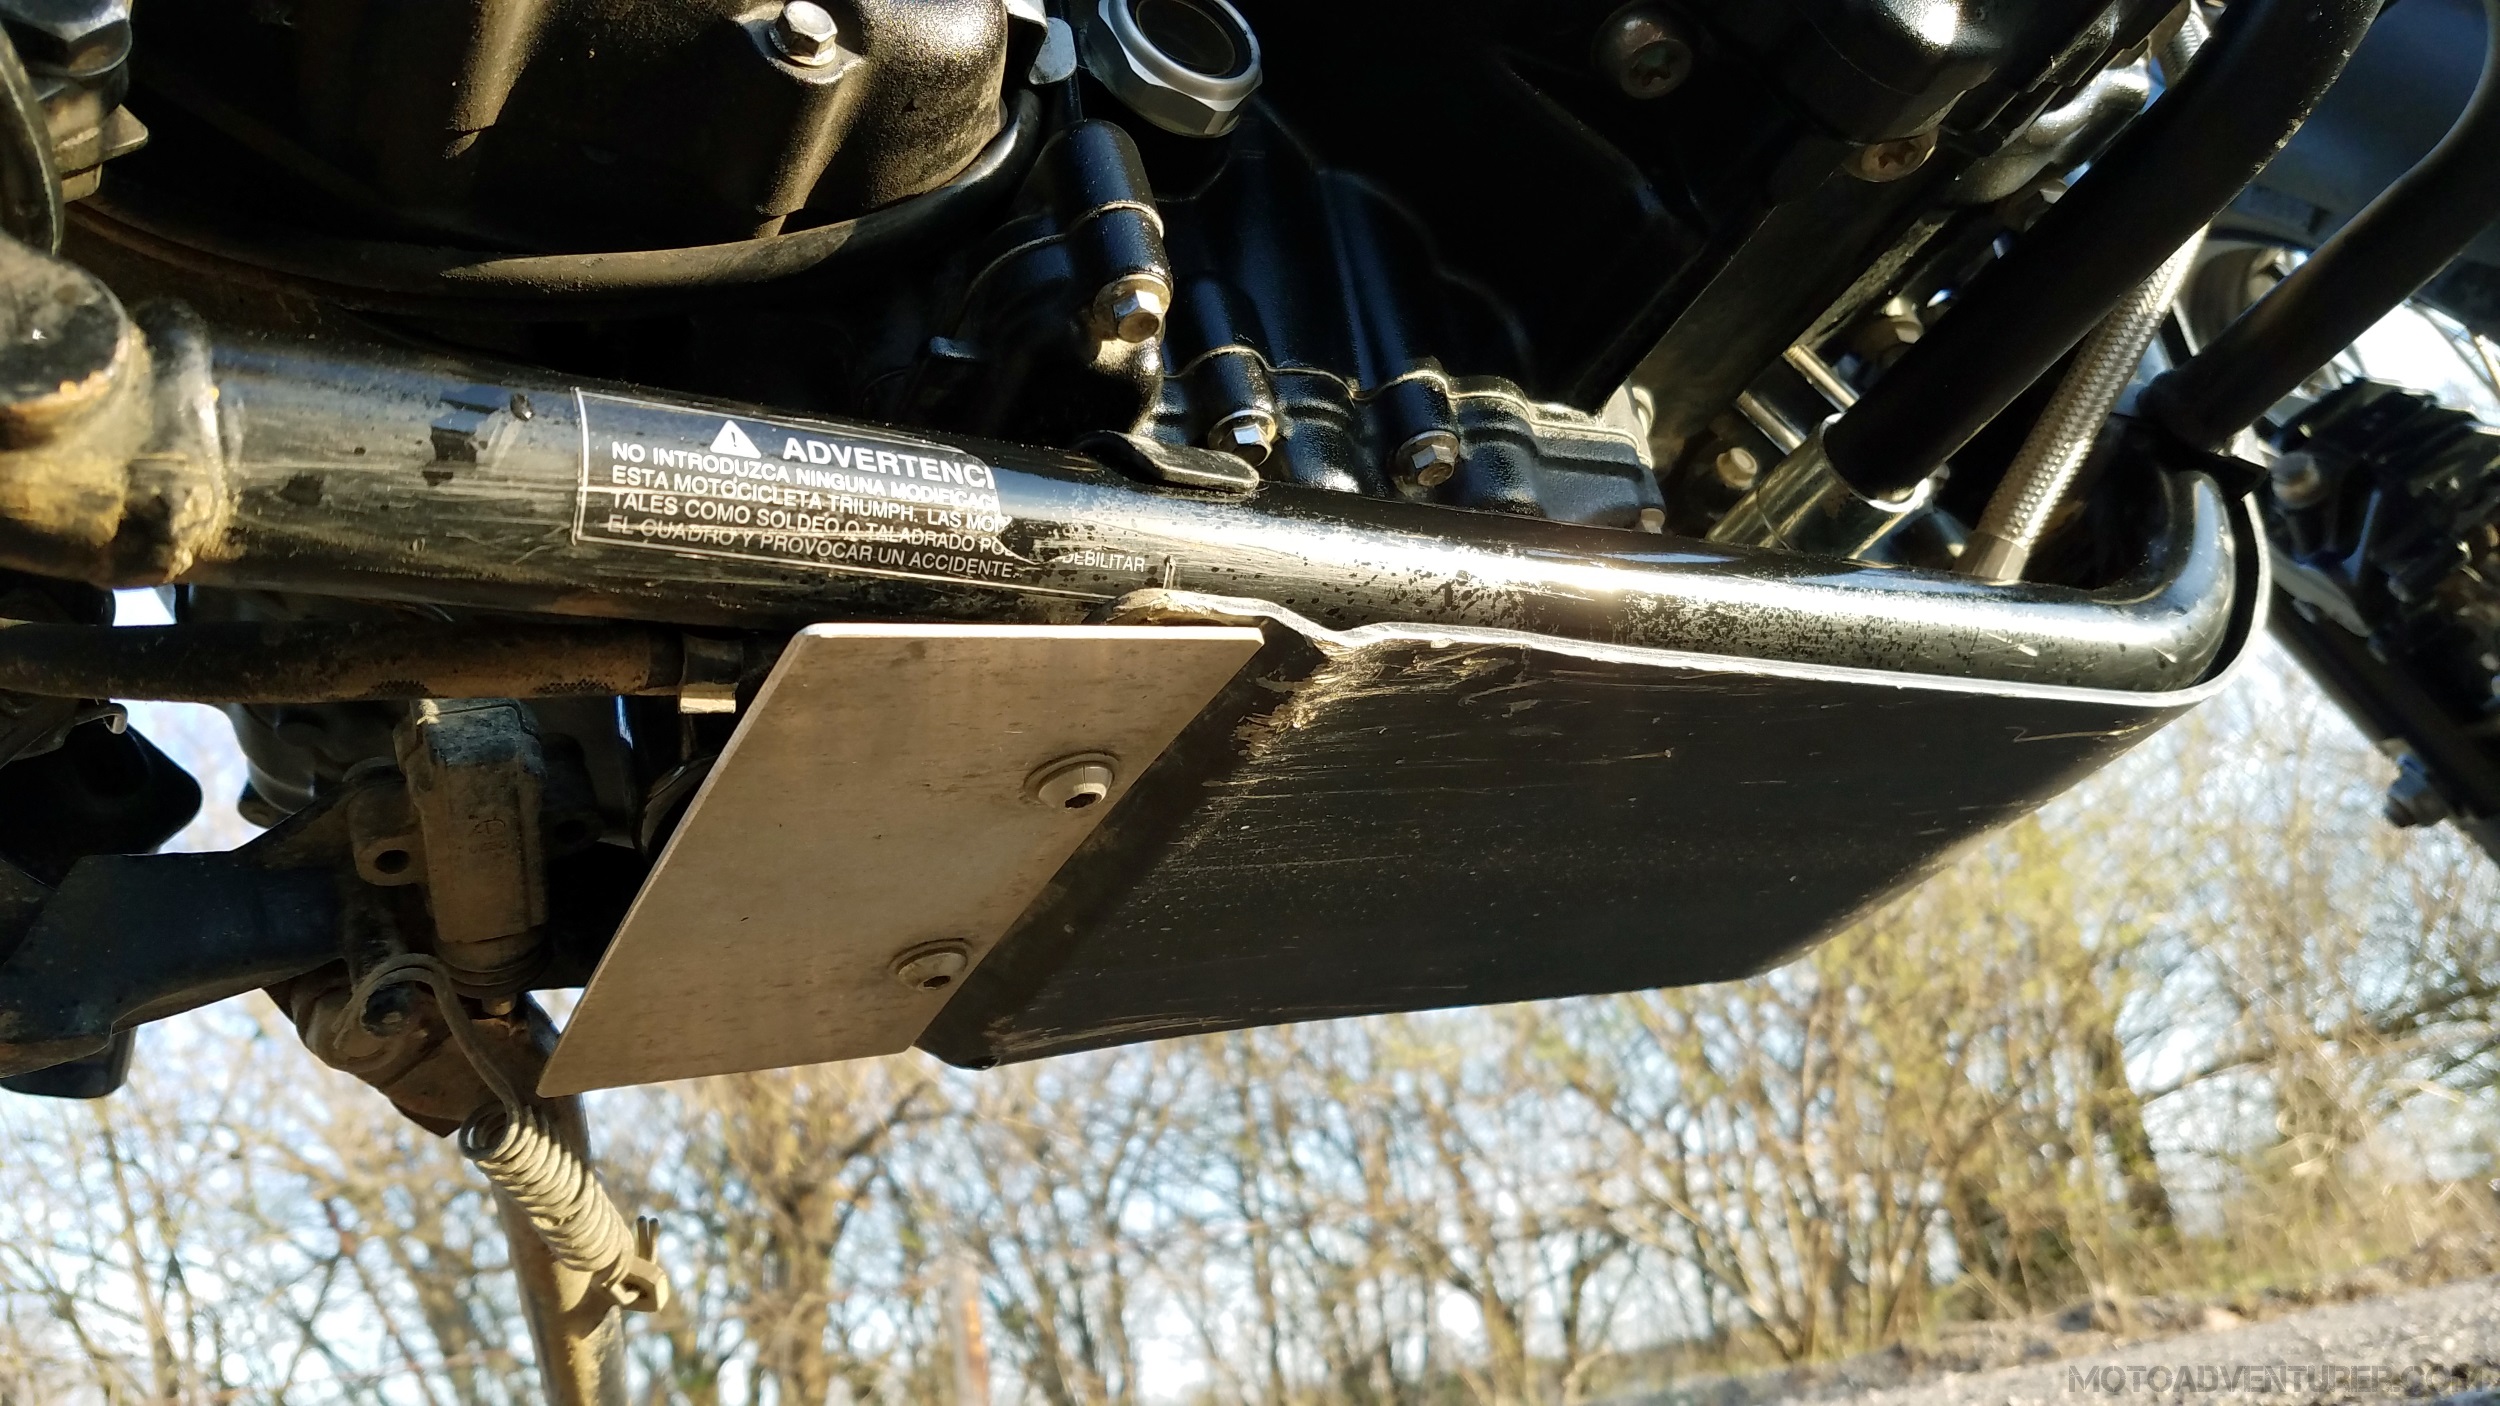 Per my write-up about “rallying up” for 2018, I wanted to extend the skid plate so that the thin-skinned oil filter didn’t become a victim of a rock strike. I’m a big fan of the “KISS” principle (“Keep It Simple Stupid” for those unfamiliar); my approach to the skid plate was no different. If I could find a piece of aluminum of similar dimensions and thickness, drill a couple holes in it, and use existing hardware, I’d be happy. I found such a piece of aluminum in a scrap bin at work one day. Things went exactly as planned. I might even paint it black… maybe…
Crash Bar Reinforcement
I’m going to warn you, this is ugly. Per my comments from the very beginning of the Scrambler Project, the crash bars need a little help. I knew I just needed to put a length of pipe in the gap between the two crash bar sections. Cutting a length of pipe the same size with a hacksaw was the easy part (okay, not easy, but conceptually…), finding a suitable bracket to hold it in place however… not so easy. I settled on a set of conduit “joints” as temporary solution. These pieces are metal, and they’ll hold the pipe in place, but it’s still ugly as all sin, and there are certainly better solutions. Without removing, cutting, drilling, or welding the existing crash bars, this is the best solution as stop-gap measure (no pun intended). Ultimately I may decide to remove the bars and craft a permanent solution.


Dart Flyscreen
I’ve wanted a Dart Flyscreen for my bike since just after I bought the Speedmaster five years ago. 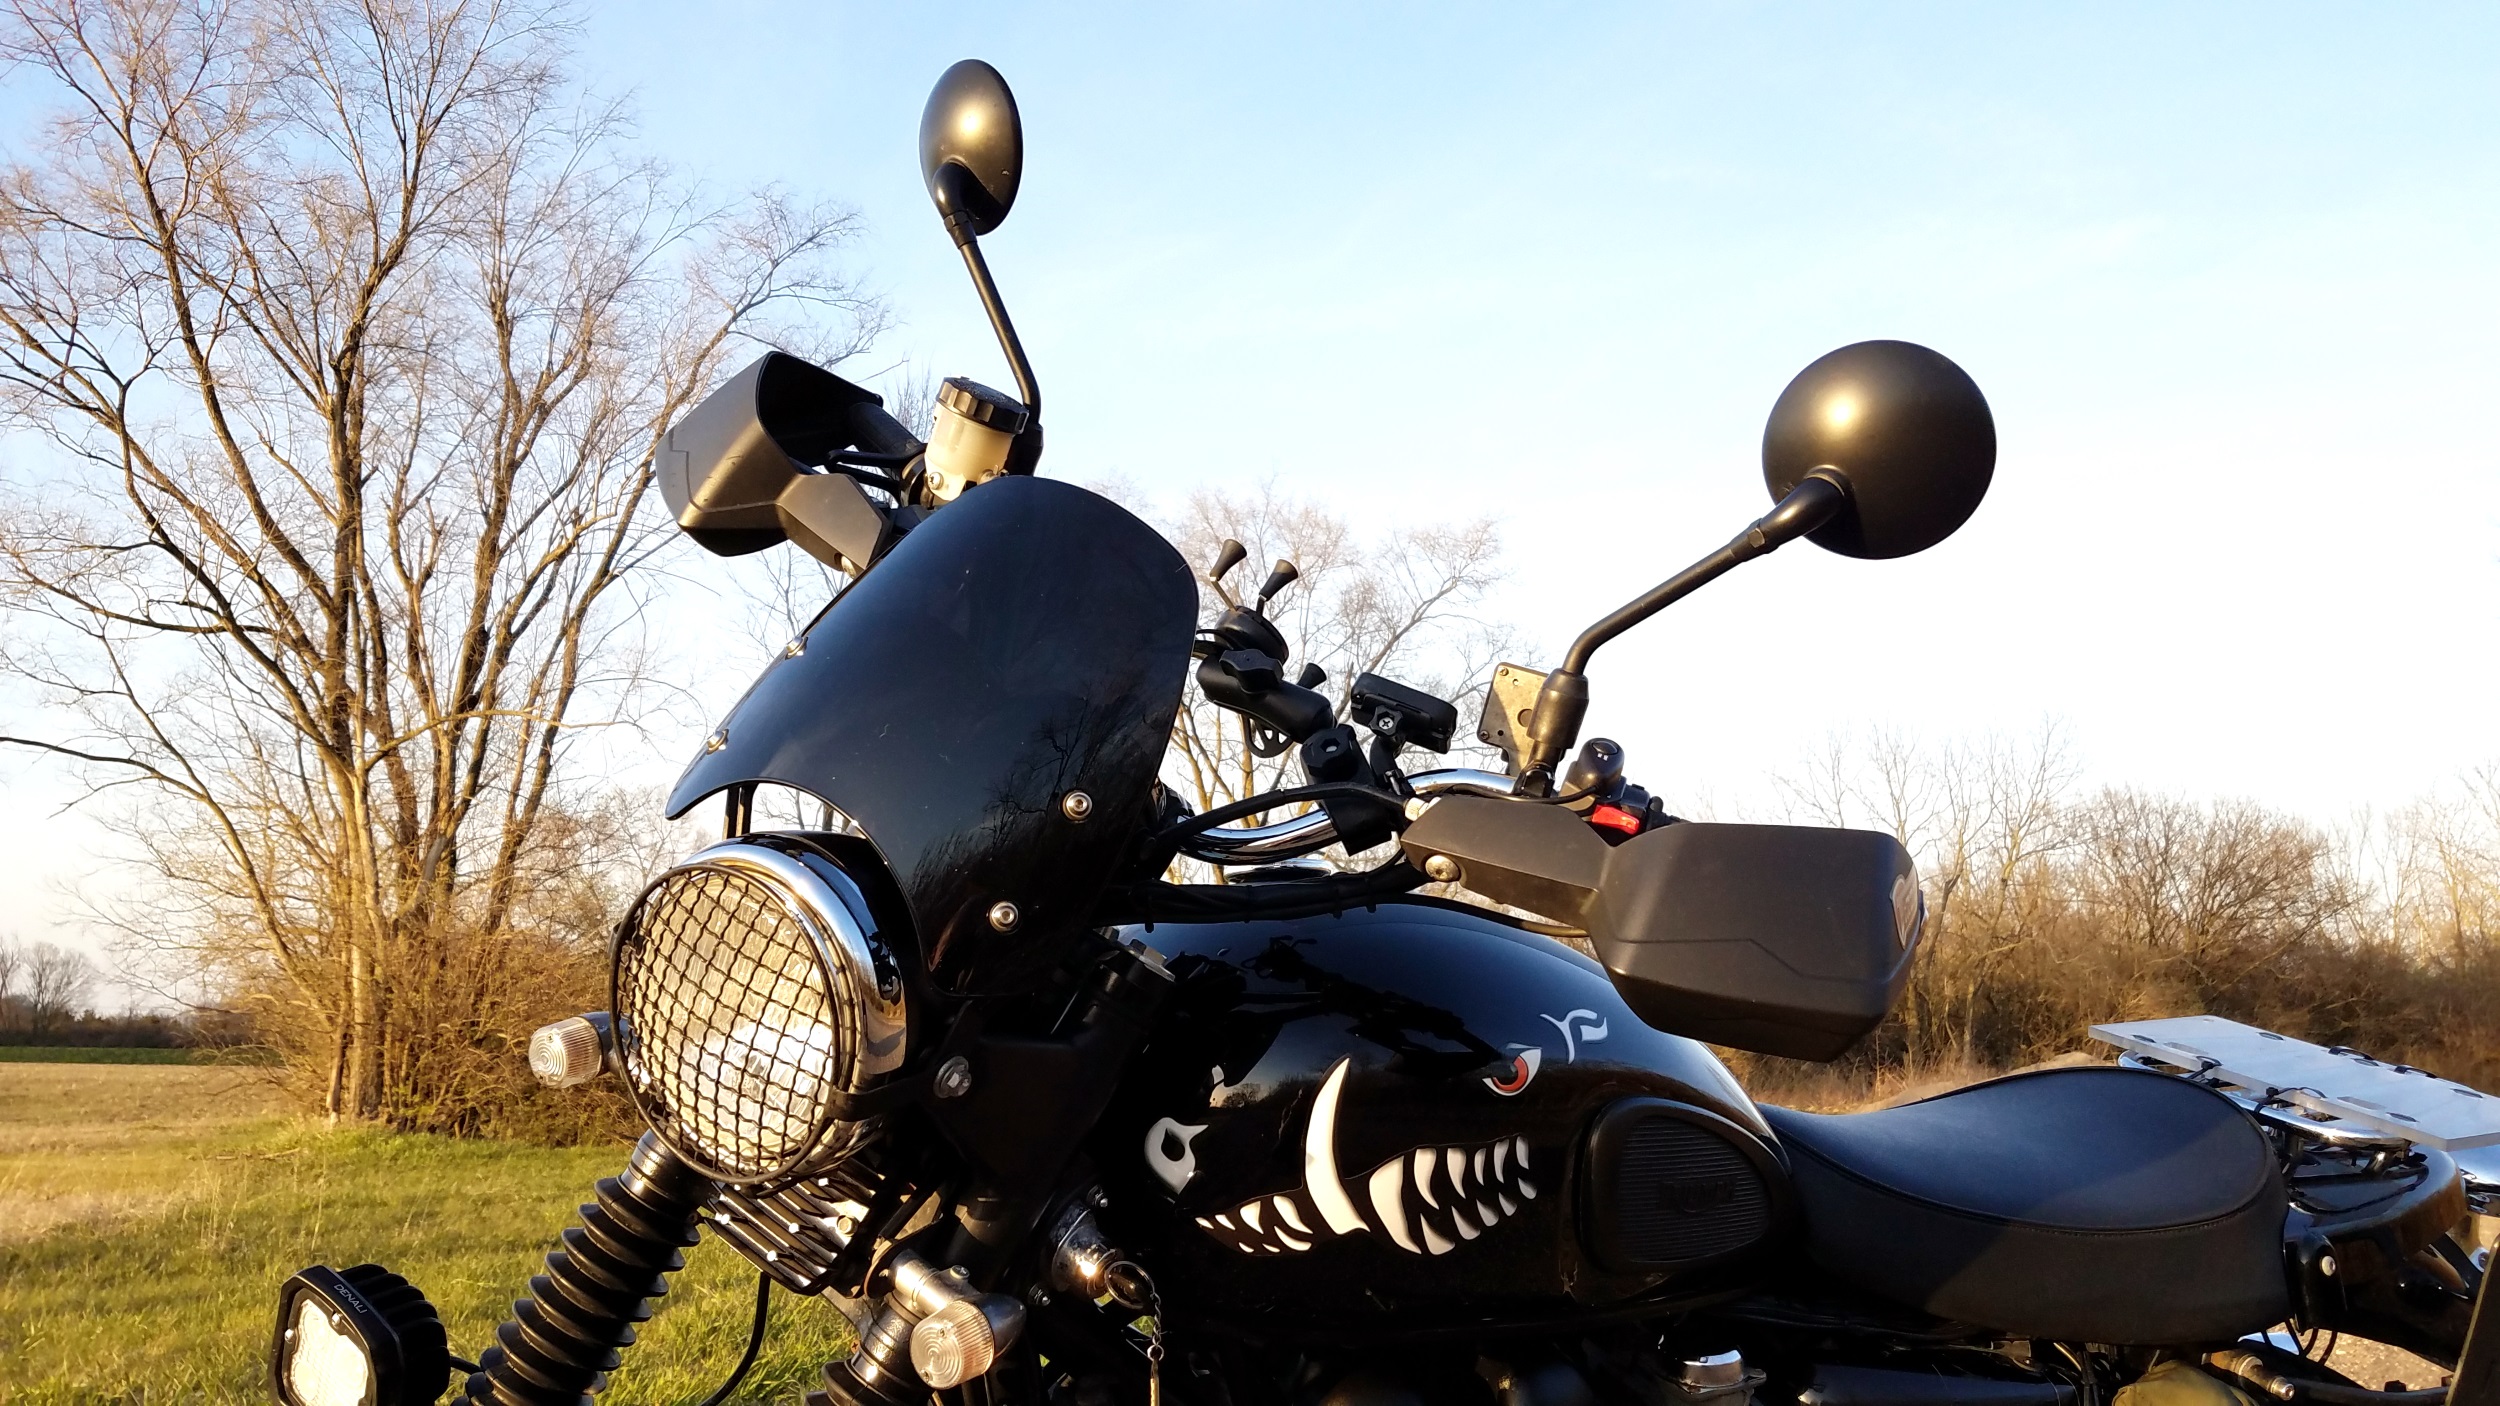 Some things worked out my way, and I mounted a classic Dart screen on the Scrambler just weeks after posting my “Rally” plans last December. Installation is again pretty easy, especially as I basically copied their design with my own garage brewed screen; just remove the bolts from the “headlight ears”, install the brackets, and then install the screen to the brackets with the provided fasteners and bushings. Dart’s quality is absolutely top notch; the hardware, fasteners, and screen are easily better than OEM quality is some respects.
On the road I’ve been very happy with the Dart. I’m often asked if a flyscreen really makes any difference, to which my reply is typically “more than you think”. For those unfamiliar, I obviously appreciate the “naked”, “classic” look of the Triumph twins, among other bikes (I.e. the XSR 900), and I don’t want a big windshield to detract from that. 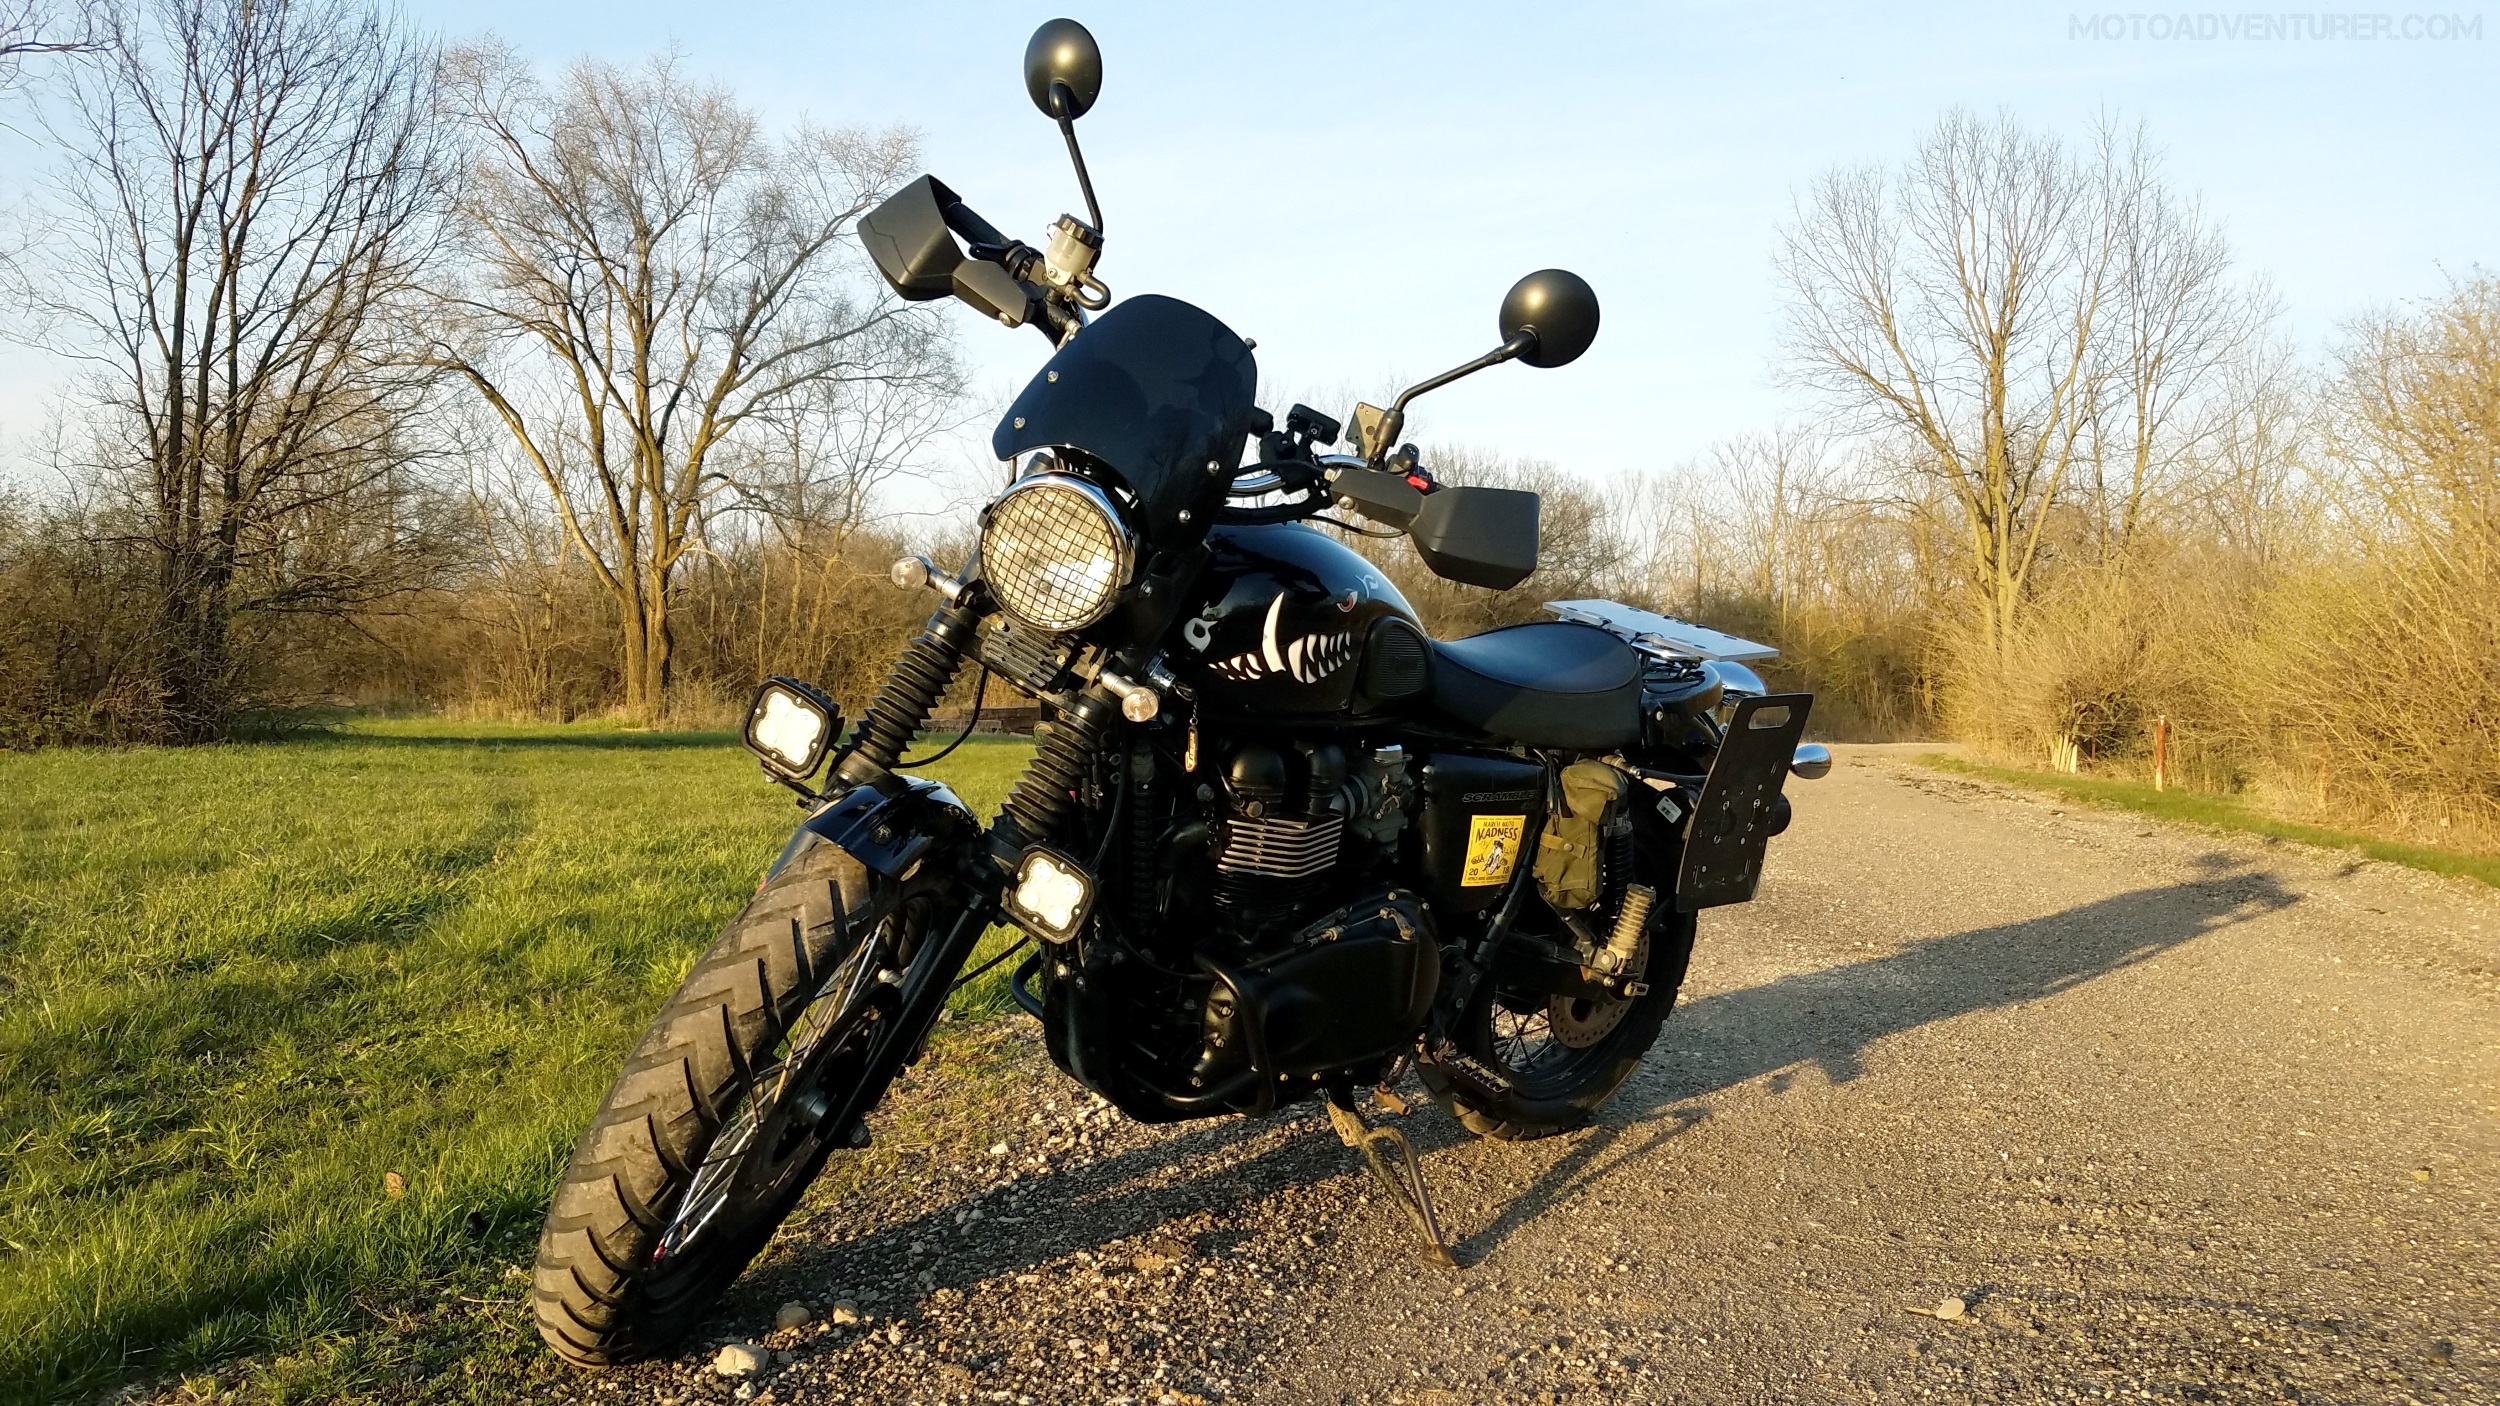 While the utility of a large screen cannot be overstated, especially on long distance rides, I simply prefer the more engaged experience in the wind. The flyscreen knocks down the wind blast just a bit, especially across the chest and shoulders, making the highway rides a lot more comfortable. To my surprise, my garage brewed screen seemed to move the airflow up a little higher than the new Dart, however I haven’t adjusted the angle on the screen yet to offer final judgement in that respect. Either way, the Dart is of much better quality, and has already done a hell of job under pretty poor conditions.
Rear Brake-fluid Reservoir Cover
This is completely cosmetic; in a departure from my mostly functional perspective on things, I have never liked the flat aluminum rear brake reservoir cover. The bike is black, the frame is black, even the seat is black… and the break reservoir is flat aluminum. I scuffed it with 220 grit sand paper and spray painted it black. Now it matches the bike, and when I scuff it with my boot, I can do the same thing again.


Oil Filler Cap
From the very first oil change I did on the Speedmaster way back in 2013, I’ve hated the oil filler cap on these bikes. Assuming you’ve never heard me mention before, I love the 865 cc Triumph mill; it just ticks a lot of boxes for me. 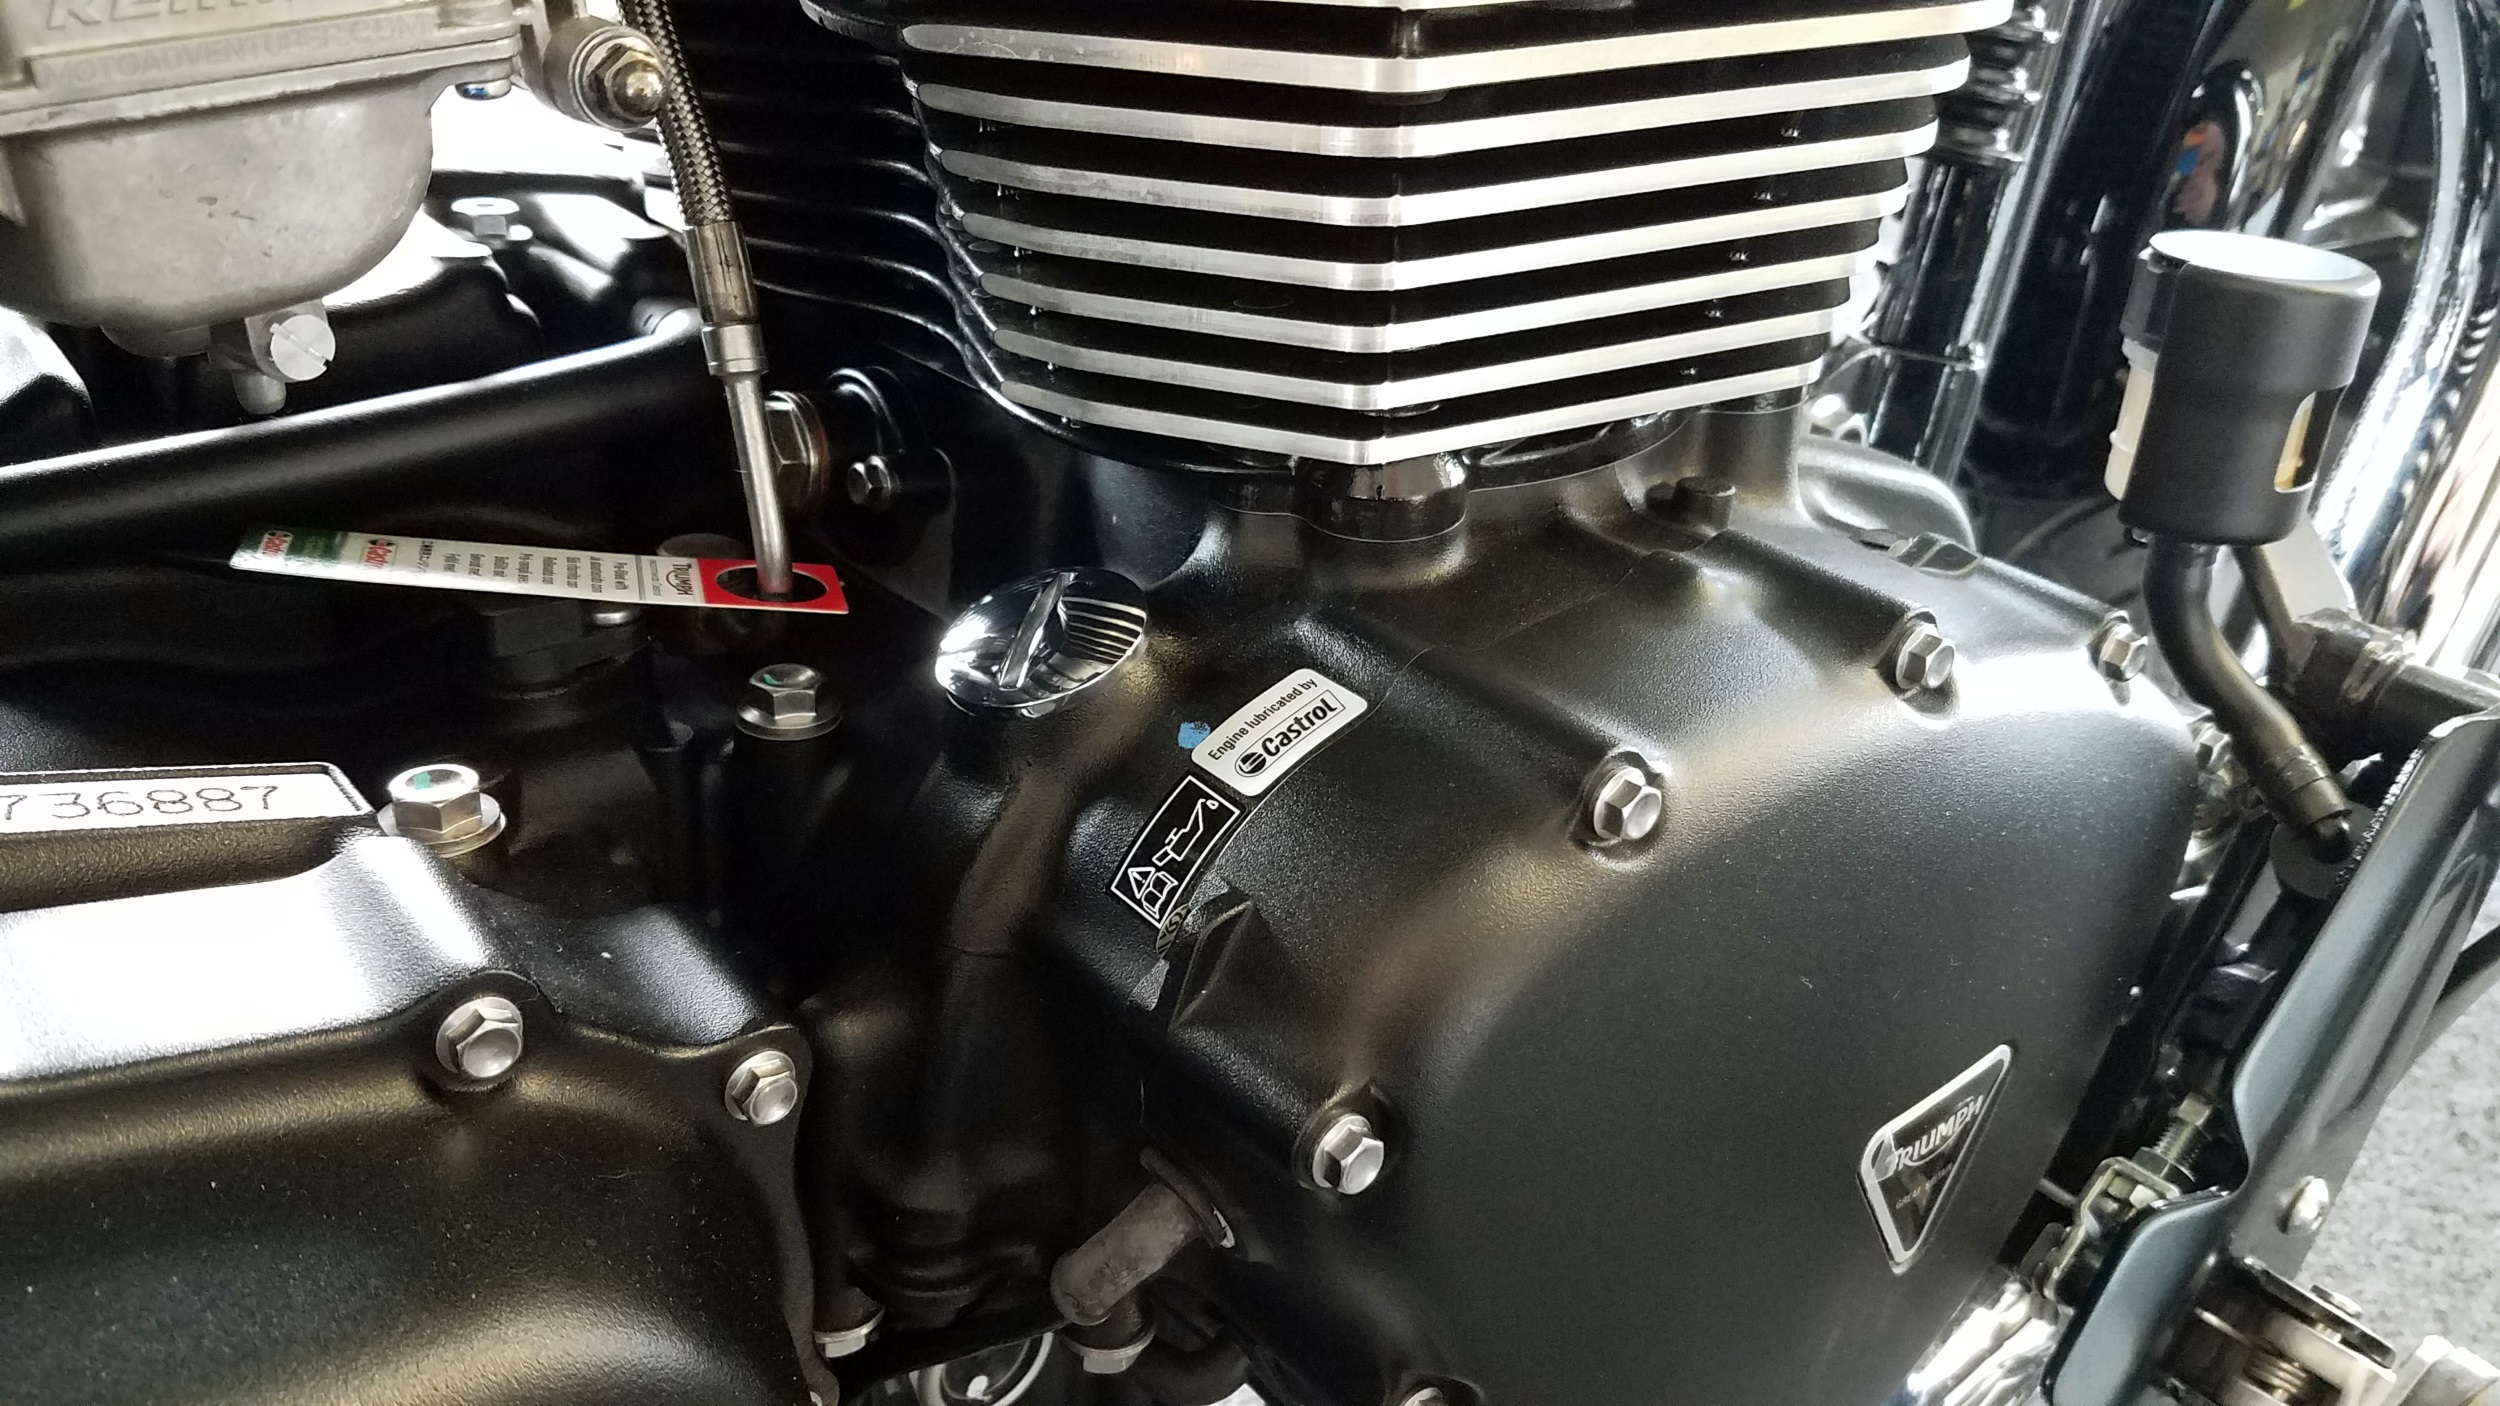 That damn oil filler cap however… “is bloody rubbish.” It’s all shiny and chrome, which is fabulous until you decide to change the oil for the first time. After which it’s marred from use, which only gets worse after each service. Moreover, if your bike ever sees water of any variety, that wonderful chrome bit, now marred from whatever tool you used to remove it, is rusting in the weather.
Along with all of the other items on my lengthy Pinterest wish list, I’ve had a replacement oil filler cap on that board almost since go. 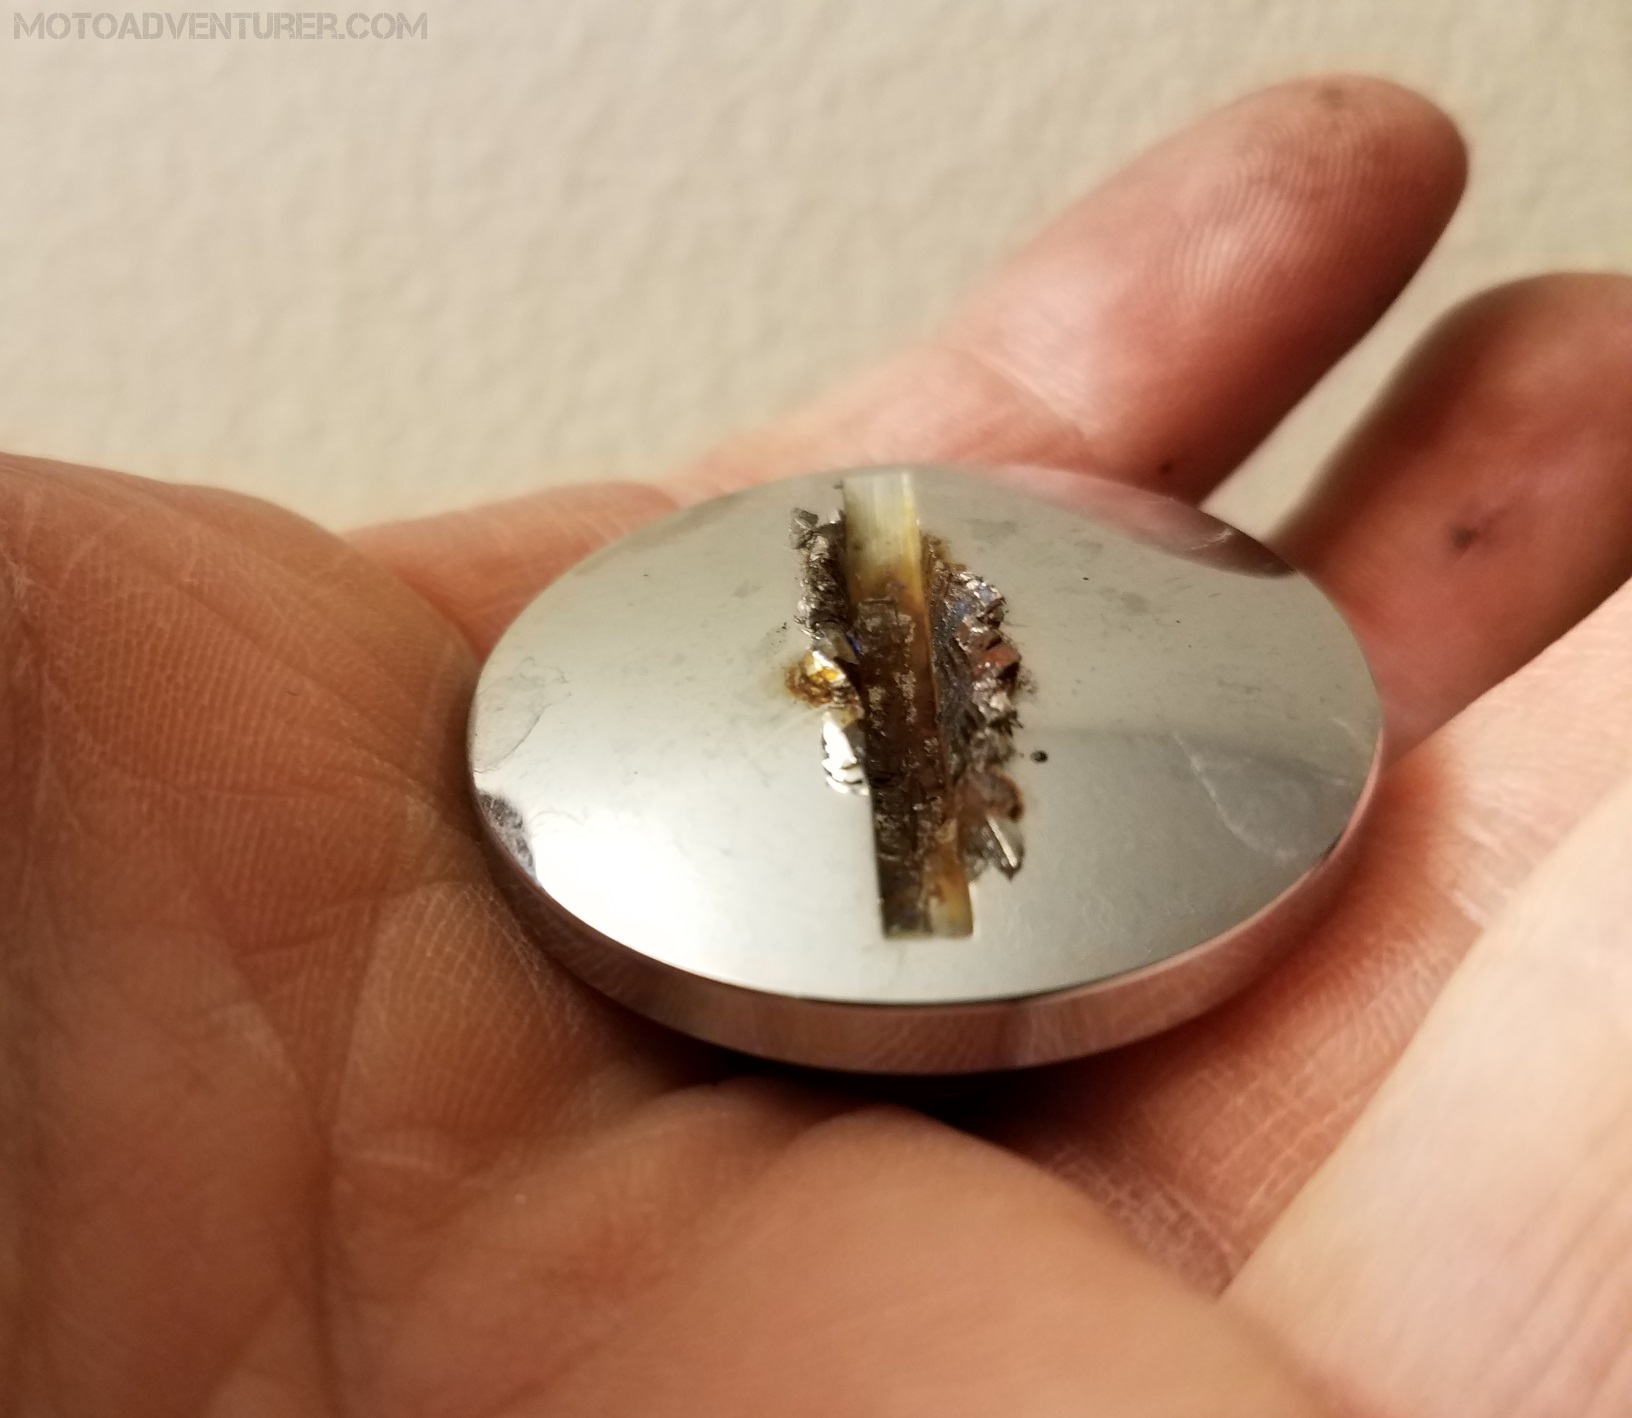 After I had significant trouble removing the cap for the 42,000 mile service a few days ago, I bit the bullet and purchased a replacement. I chose the Joker Machine cap considering it offers me the ability to safety wire the oil cap in place. The likelihood of that necessity isn’t particularly good, however at some point I’ve debated taking the scrambler to a track day, and that may be useful at that time. Until then, I have the convenience of removing the oil cap with a wrench, hex key, or a screw driver, depending on what’s available to me. That and well, it’s black… as it should be.


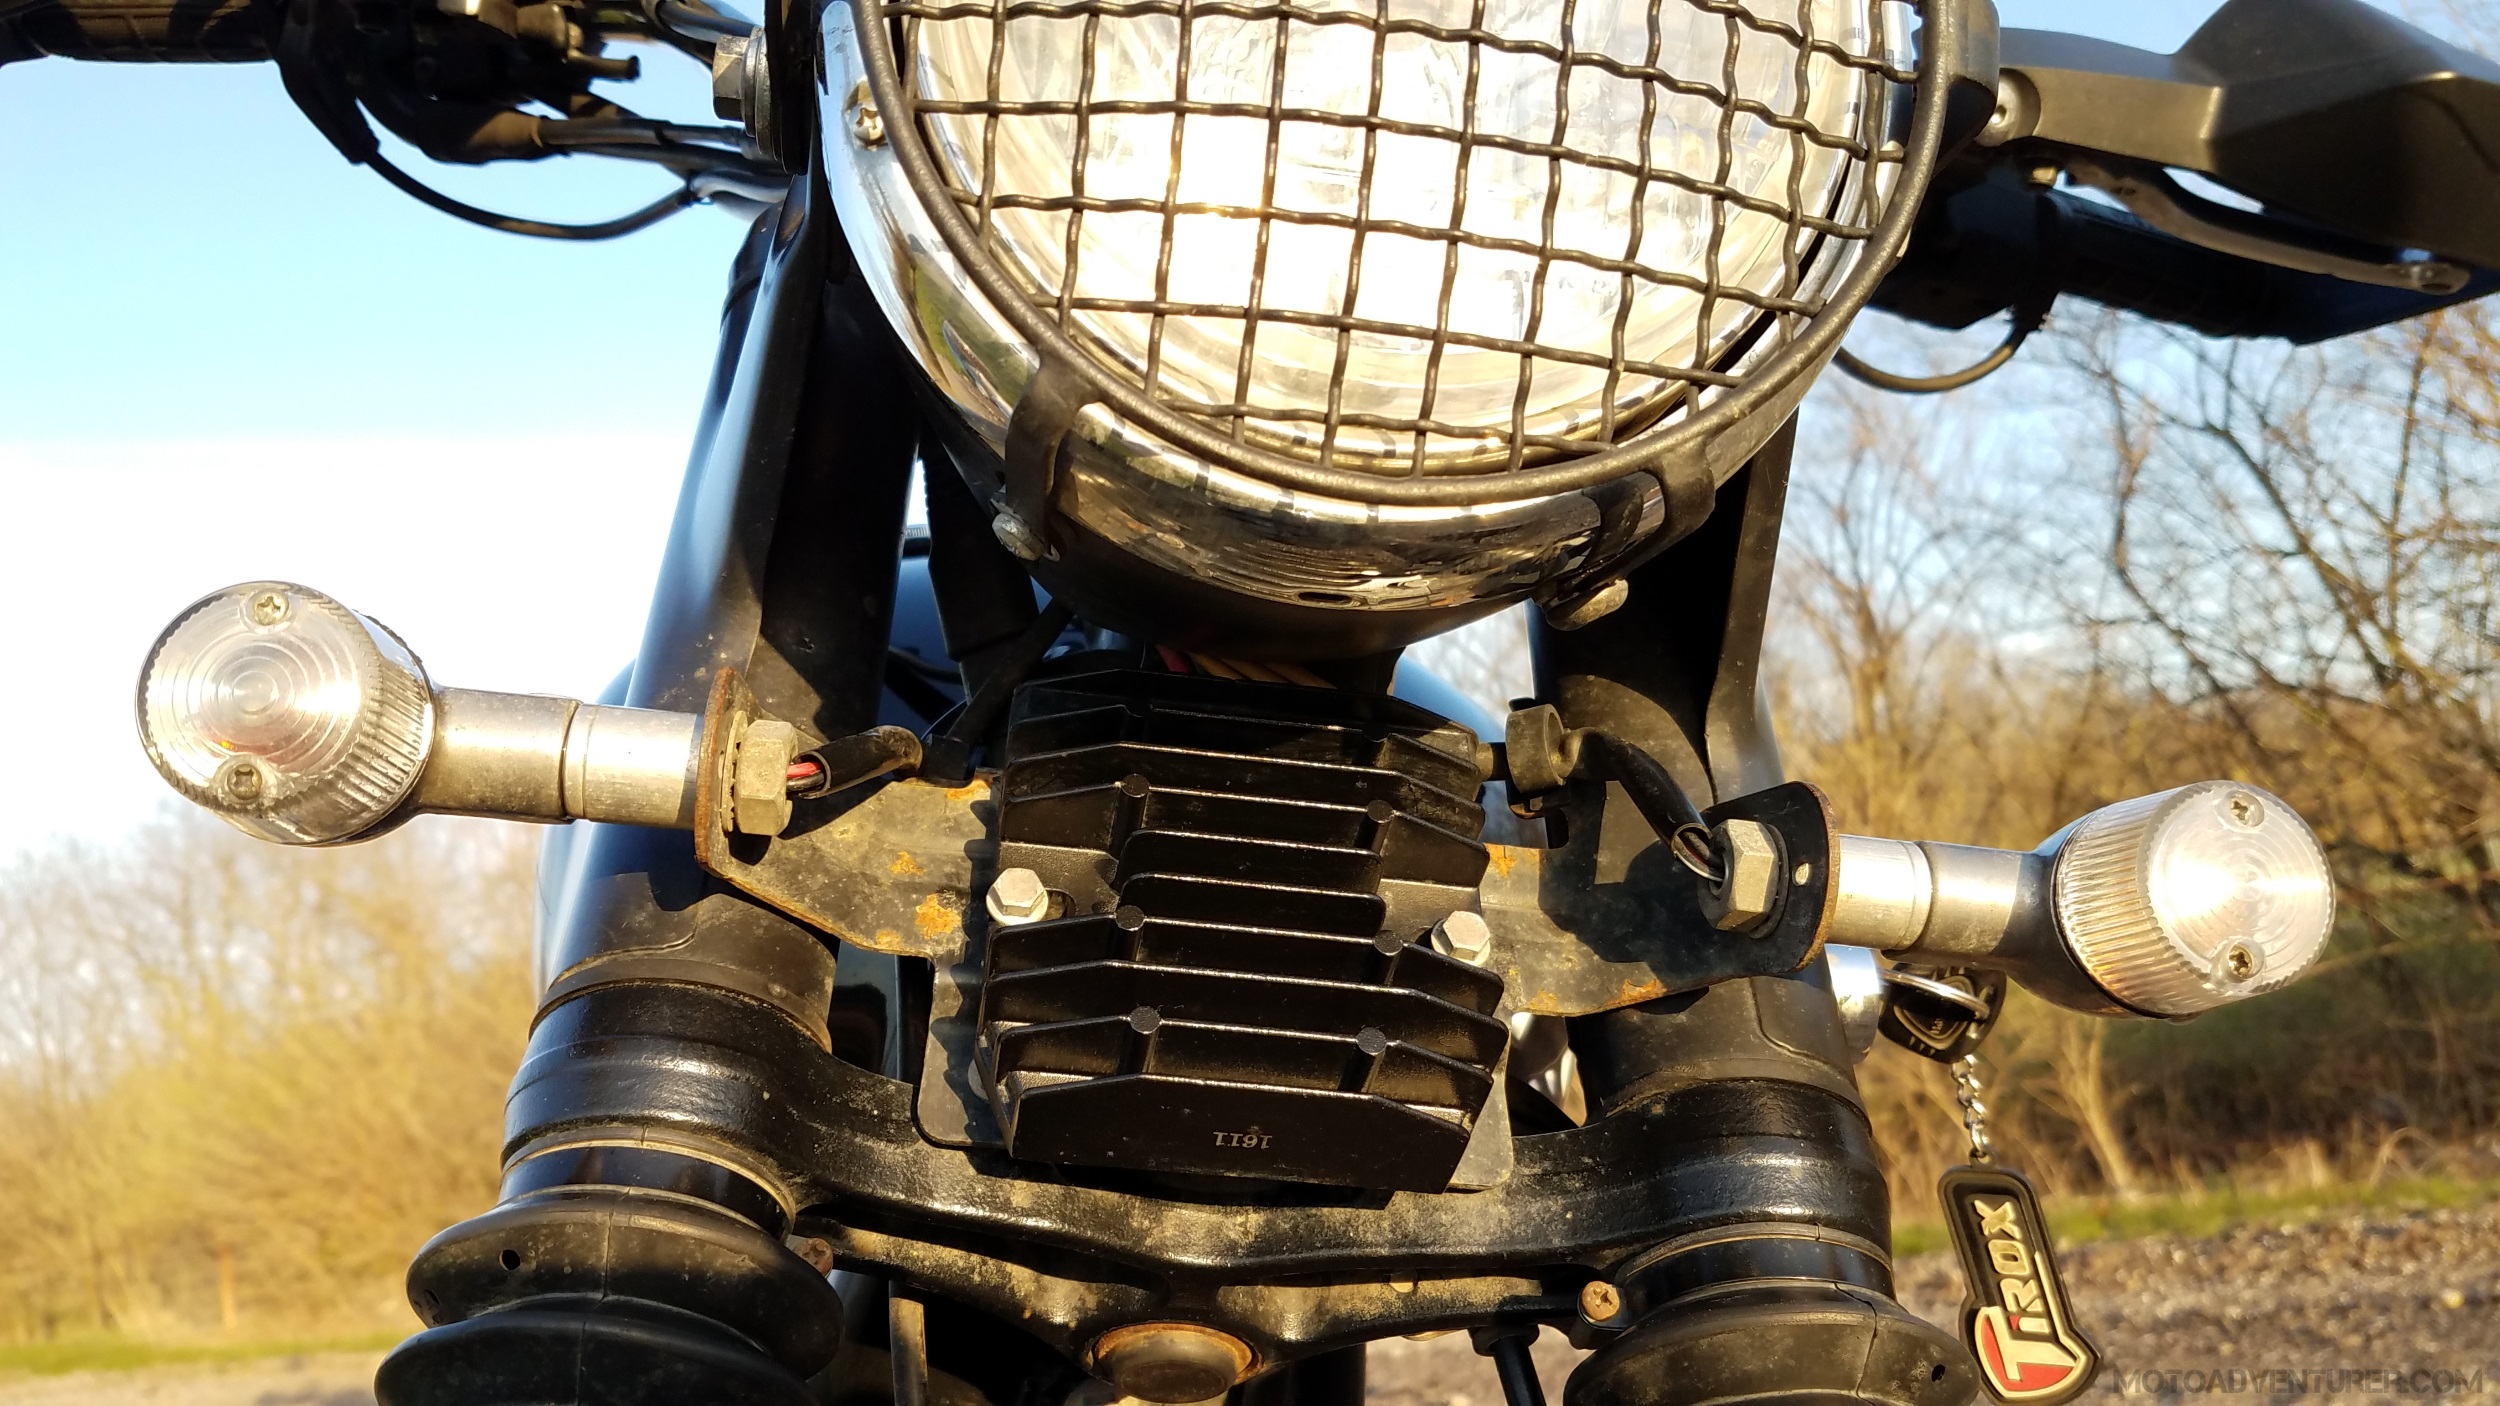
Rectifier Replacement
On day 230 of the riding streak, I went to start the bike and got the dreaded “Click…. Click… Click…” of a dead battery. I charged up the bike and rode 10 miles to keep the streak going, after which I started pulling the bike apart to ascertain what was going on. Whilst riding on days just prior, I noticed that my Oxford heated grips were throwing up the “engine is not running” warning light, threatening to turn off the grips to save the battery; I obviously knew otherwise, as I was actively riding!
Pulling apart the headlight bowl, yet again, I noticed some of the wire splices looked funny. 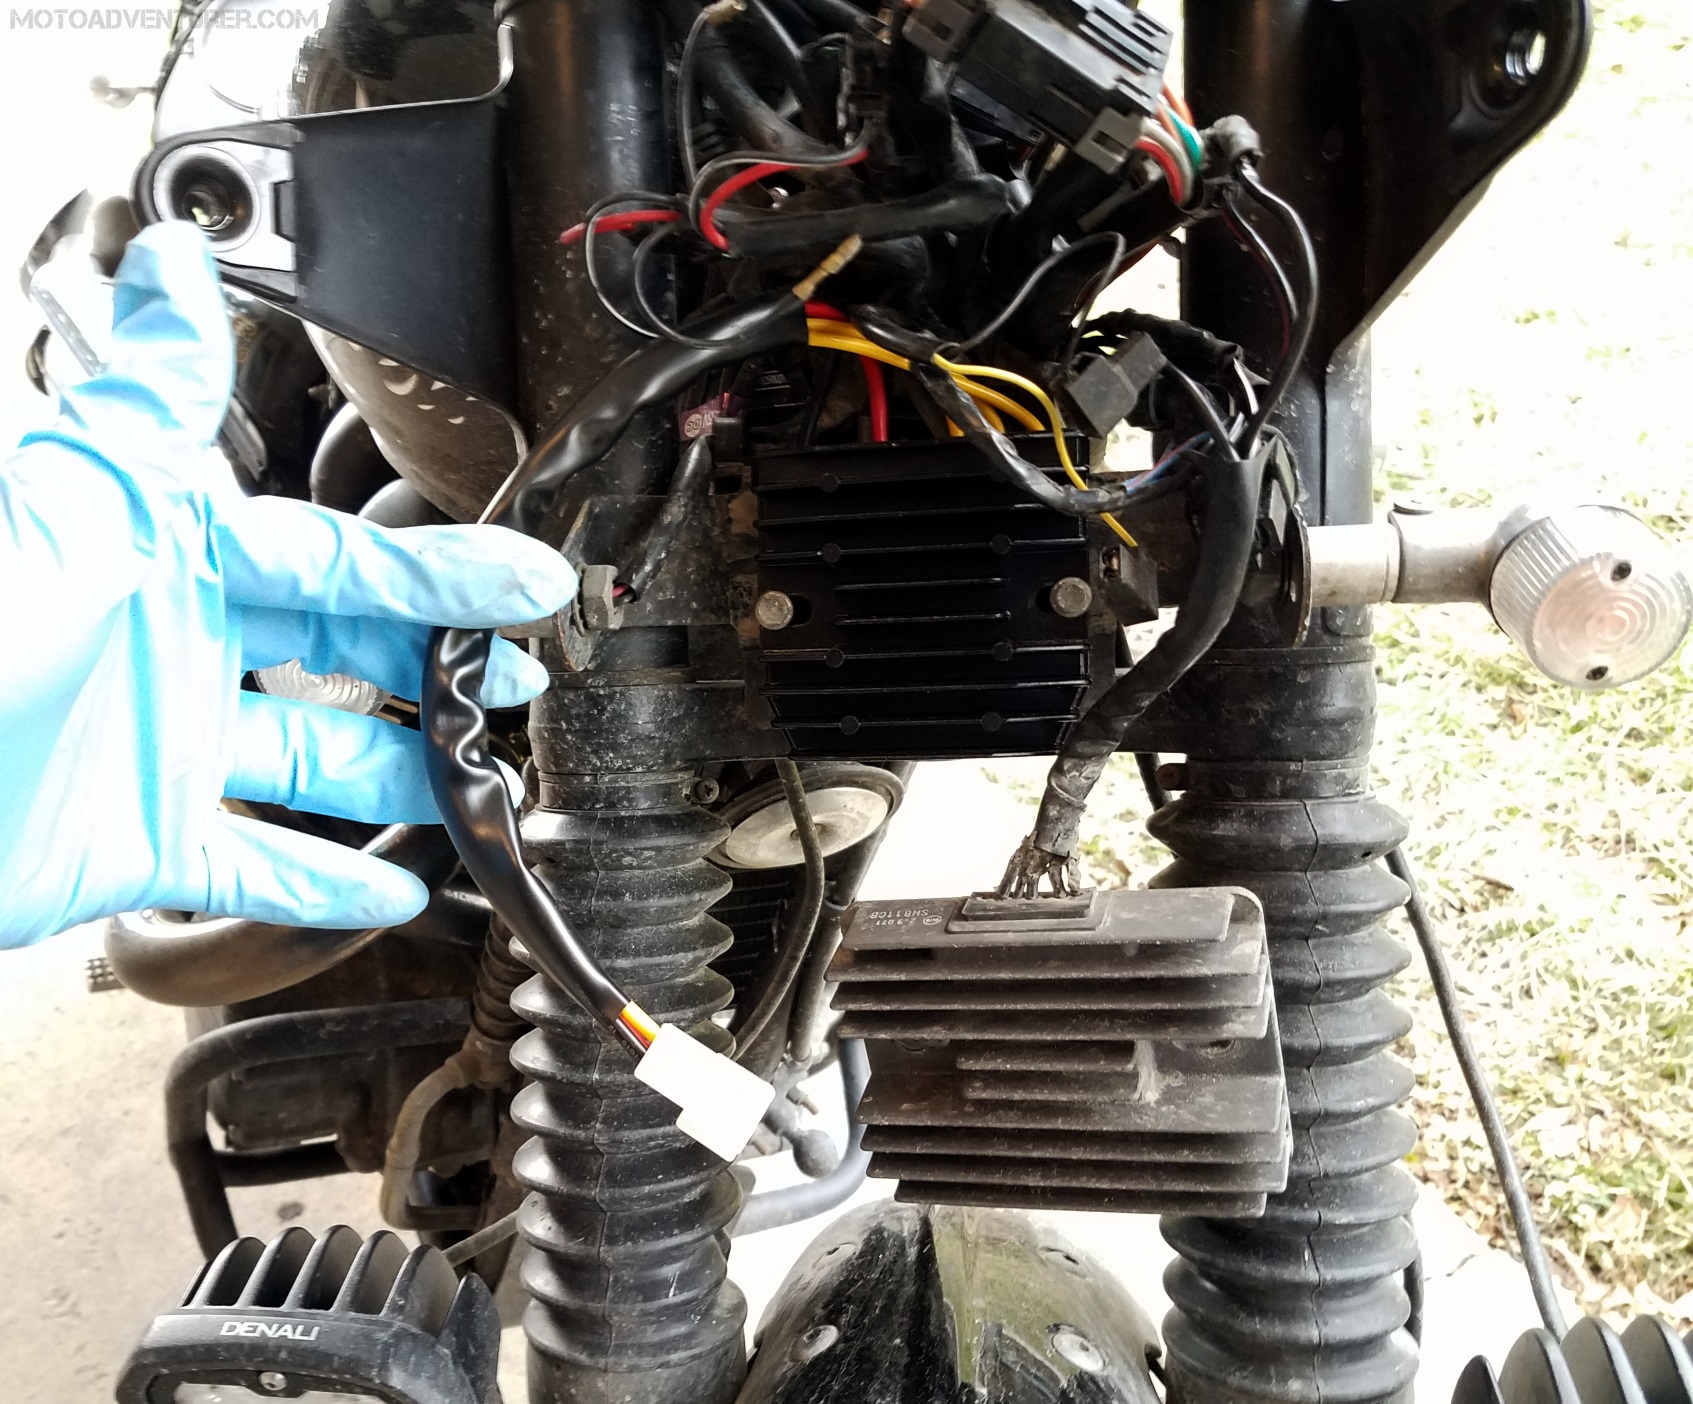 Upon closer inspection I found that some of the splices had melted together and grounded the hot wire from the rectifier. That was the last nail in the coffin for the stock rectifier. Admittedly, the stock regulator/rectifier was not positively identified as the culprit, however after enough internet research and finding melted wires in the leads from the rectifier no less than twice, I took it on good advice from the Triumph forums, that it was time to upgrade to a MOSFET rectifier (Metal-Oxide-Semiconductor Field-Effect Transistor).
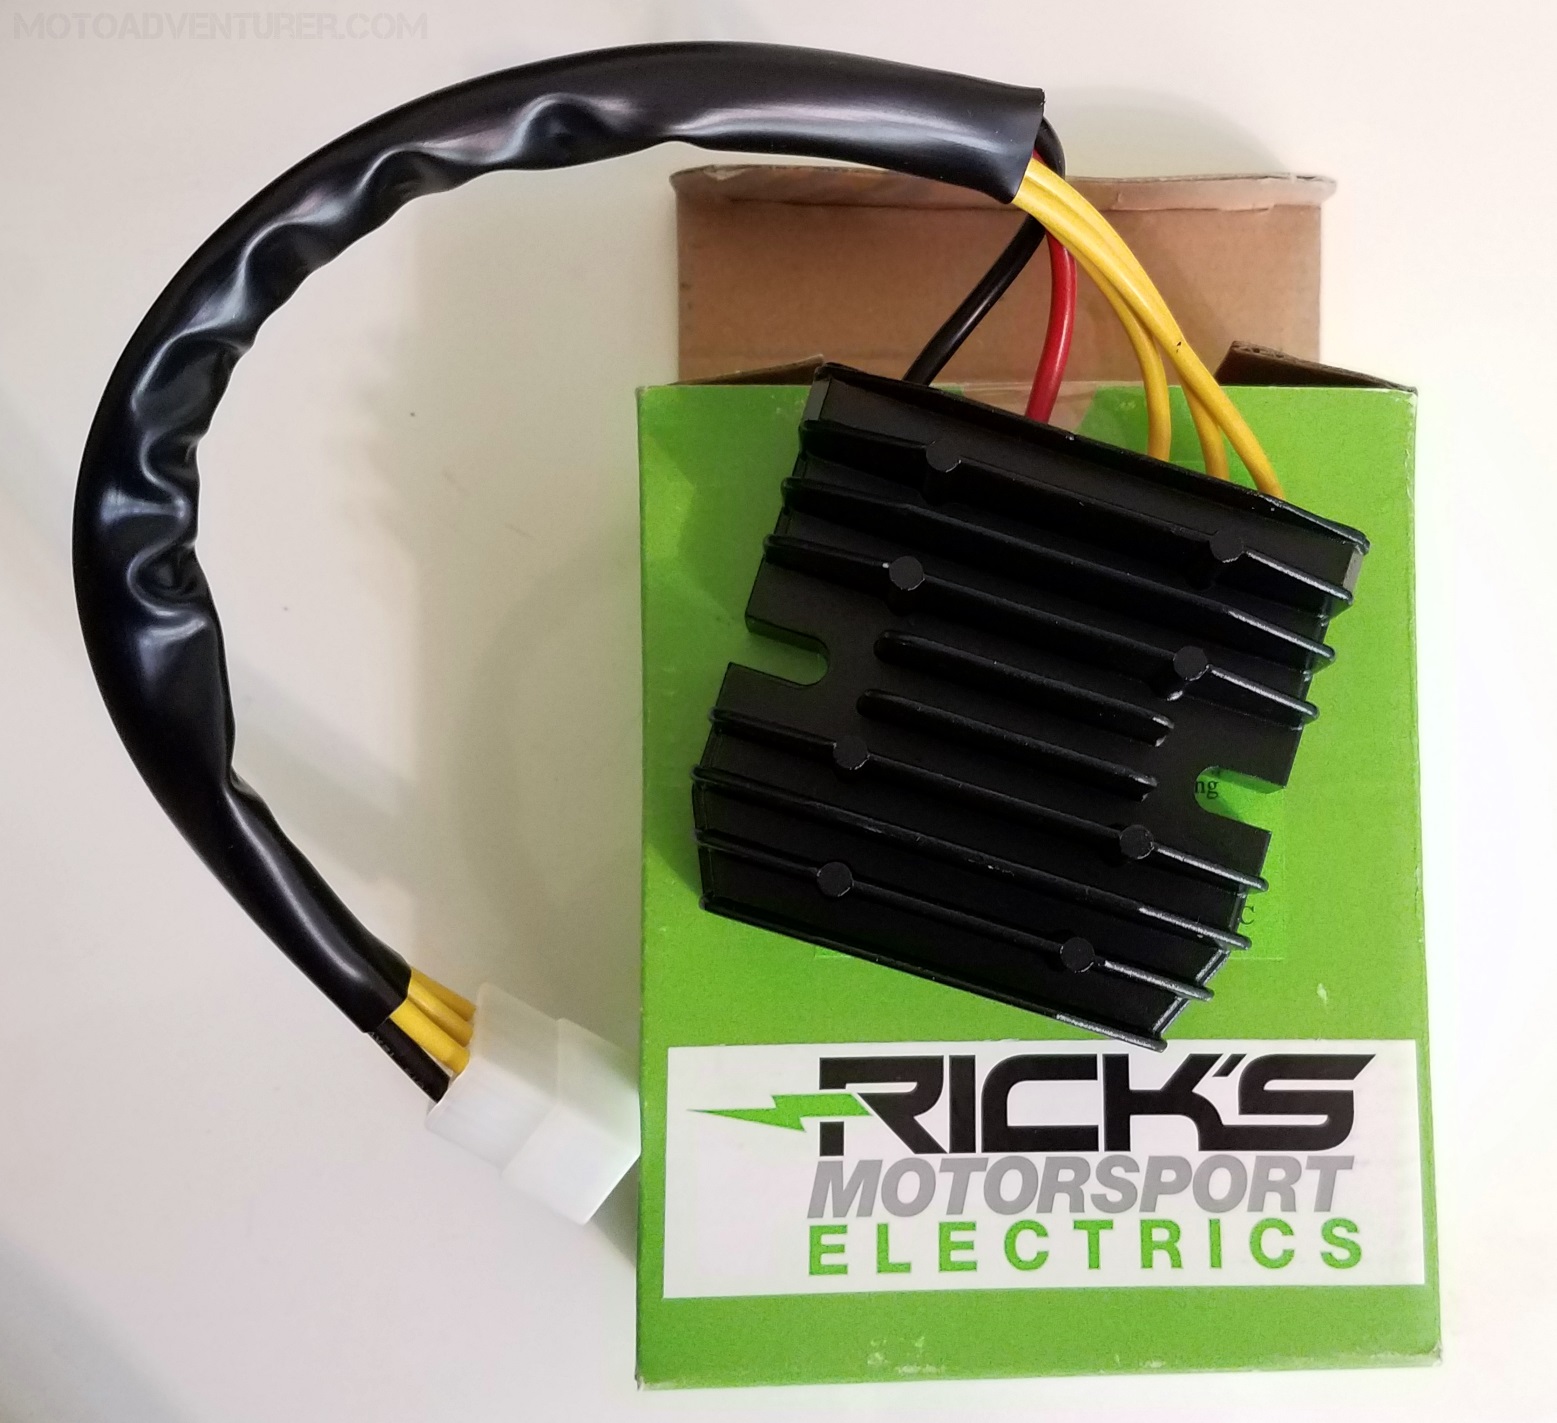
After searching the web for various options, I decided to make the investment on a unit from Rick’s Motorsport. The Rick’s MOSFET unit is more toward the upper end of the price spectrum, but had the most positive reviews and is provided with a connector that mates to the OEM main wiring bundle. That OEM connector was obviously damaged in the first go-round last July, so there was a extra little electrical work on my part, but for the most part it’s a quick bolt-in replacement for most folks.
 After installation, the new MOSFET regulator/rectifier had better output voltage; I will go as far as to say that even the heated grips “felt” warmer, and seemed to warm up faster as a result of the change. Hopefully the advice on the web is true, that the MOSFET will run cooler and more efficiently. I’ve done about 2,500 miles since the replacement, so far so good.

“While the utility of a large screen cannot be overstated, especially on long distance rides, I simply prefer the more engaged experience in the wind.”…
Exactly! My tallest windscreen is the stock one on my F800GS, and though I have (briefly) ridden a bike with a LARGE screen and a full fairing, I simply didn’t like the removal–I ride to be immersed in the experience of riding.
Give me a full face helmet, and I’m as happy as a clam (whatever the hell that means)… Let me be buffeted by the wind and blasted by the weather and pelted by bugs and rocks and road debris—I want to feel the ride, and I want to “have to” hug my bike for the sake of aerodynamics. Shit, there’s enough “convenience” that’s already striving to separate me from the sensations of living. I want to be as alive as possible, and that’s why I ride…
LikeLike
The long rides can be pretty brutal depending on weather. I got pounded to and from Illinois last weekend in the rain and relentless wind, but I admit, that’s not the kind of riding I’m doing 90% of the time, I typically have an all-day rural route put together, and that’s exactly it, I want to be connected to the elements.
LikeLike
Pingback: Ride Every Day: Reflections on 270 Days in the Saddle · Moto AdventurerMoto Adventurer
Pingback: Conserve The Ride 2018: New Friends and New Adventure · Moto AdventurerMoto Adventurer