
All of the exciting spring riding finally caught up to me last weekend; the odometer clicked 30,000 miles and it was time for another service.  The modern Triumph twins run full synthetic oil, so the service intervals are every 6,000 miles, which is actually pretty convenient. I would imagine that “normal” riders could feasibly change their oil each spring and stay right on schedule. Frequenters to this blog have probably realized by now that I have an affliction, and I don’t see any cure in sight (besides more miles). Every-other service interval (12K, 24K, and so on) requires a valve check and/or adjustment; for folks with a garage, that’s probably not a huge hassle, but for us porch dwellers, it requires some assistance; especially if you’re waiting on parts (i.e. new shims). Fortunately, this was just another oil, filter, chain, and cable adjustment service which is really no big deal in the driveway. The older I get, the more I begin to understand that sometimes paying someone else to hassle with things is worth the expense. I’m still debating if the 36K service is going to qualify for paying someone else (I really don’t feel like adjusting valves…). That being said, a couple hours and a few dollars left in my wallet, I’ll gladly change my own oil and filter; moreover, I figured I’d share whatever wisdom (or mishaps…) I’ve found in the process.
The first step in this maintenance experience is typically me dragging tools, oil, chain wax, funnel, etc. out onto the porch. I also have a Haynes Manual, and a Factory Triumph service manual, but for the 30K service, you really only need the owner’s manual. The Triumph website has PDF copies of each model’s owner’s manual, so I typically print off the service interval pages so I can check off each step as I complete the given maintenance tasks. As a caveat, let me point out that I am not a certified mechanic, and always recommend following your factory service manual when performing your own maintenance. Like other riders I know, I occasionally deviate from the “prescribed” method in the interest of time or convenience; that first deviation being that I like to warm up the engine “a little” prior to draining the oil from the bike.  I imagine the service manual prescribes getting the oil up to operating temperature prior to draining, however I find that 200+ degree motor oil tends to burn the skin. Regardless of the number of oil changes I’ve done, I have yet to figure out how to remove the drain plug and manage to keep your hands clean, especially when you’re dealing with close quarters like I am (I don’t have a motorcycle jack).
 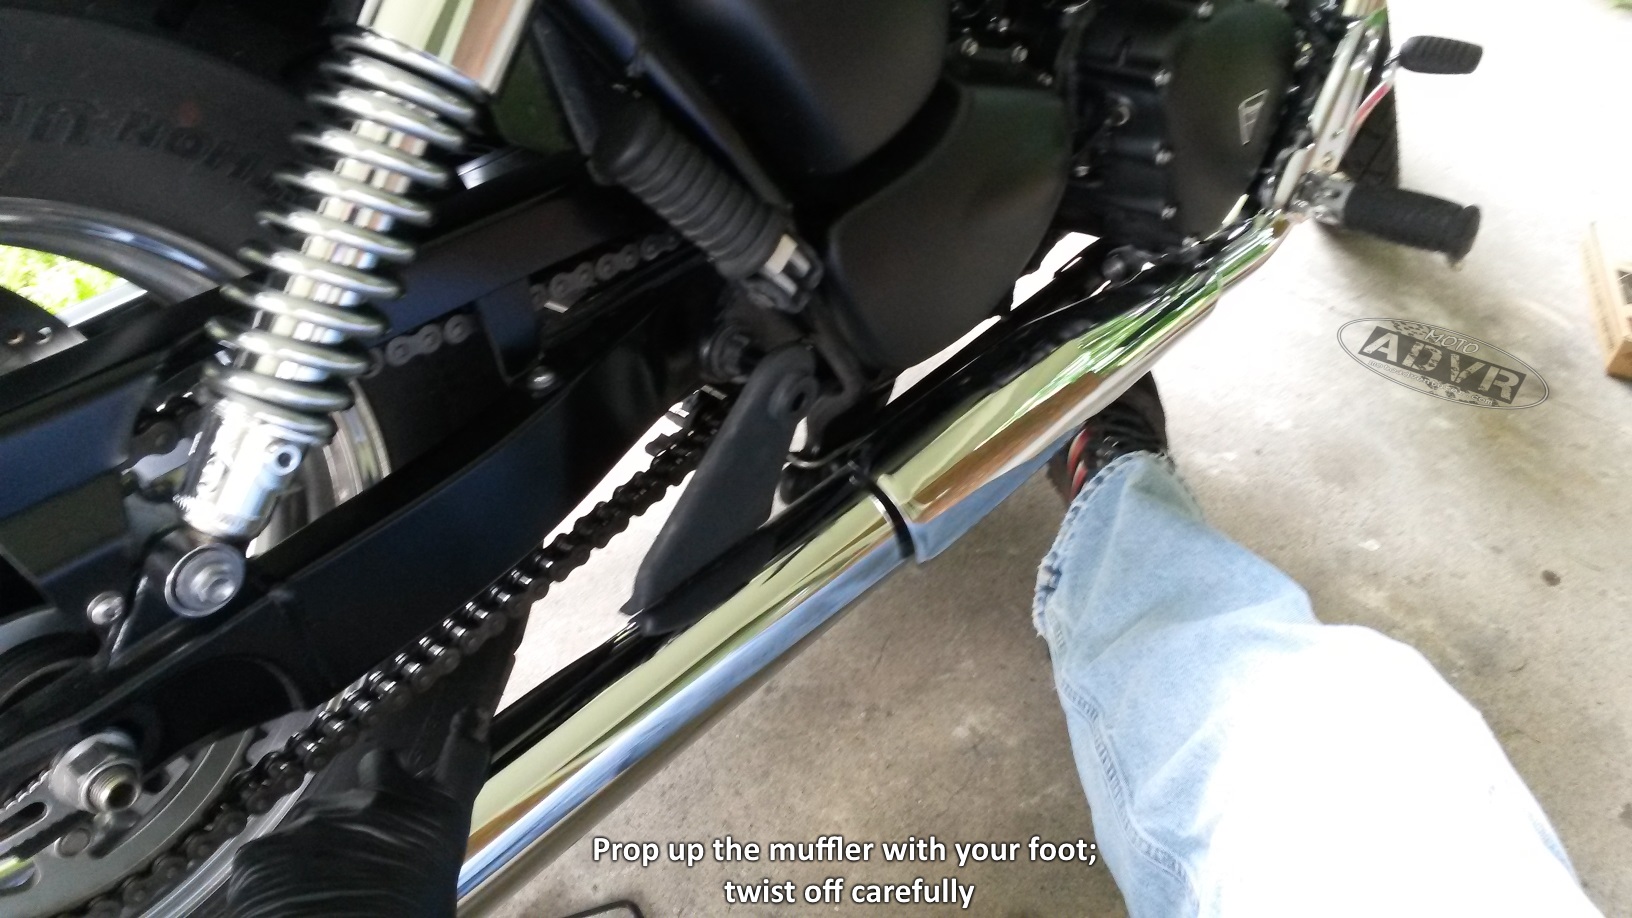 At any rate, after I warmed up the engine, I removed the exhaust slip-ons (hence I warm up the engine “a little”). Removing the slip-ons in my case is not required, but it makes doing chain maintenance a lot easier; I can also see under the bike better. Removing the slip-ons is two bolts on each side, so it’s honestly a 5 minute ordeal. With the slip-ons removed, I pushed the oil pan under the bike and cracked off the drain plug.
  I also grabbed a piece of scrap cardboard to put under the oil pan, it was pretty much guaranteed I would drip oil on the concrete at some point. If at all possible, check your drain plug for any metal shavings. Thus far I’ve not found a
 ny, but I’ve been told that if your motor is eating itself, you’ll find shavings in the engine oil. Once the oil was down to a reasonable drip I grabbed my oil filter wrench to removed the oil filter. On some bikes you could feasibly remove the filter by hand, or with other “quick” or “easy” tools.
 In my case, there’s no room under the Speedmaster to wrap the rubber strap around the filter and twist it off, so invested in a $10 wrench for my 3/8th inch drive ratchet to remove the filter. Not dipping the wrench into warm engine oil in the pan is somewhat of a trick, but it’s still better than busting my knuckles trying to pry off a filter. I’m pretty girly and wear latex gloves for this job; I suppose if I was still working in a body shop it wouldn’t matter, but I find that my engineering manager looks at me a little sideways when I have black lines under my fingernails from working on my bike. If your filter is completely vertical like mine, taking it off pretty much guarantees your hand is going to take an oil bath, be aware if you’re doing this with a hot engine.
 Once the filter was off I started prepping the new filter prior to installation. I typically put a 2×4 under the side stand to keep the bike upright to drain properly and completely. Needless to say, that’s pretty dangerous, bumping the bike could easily result in a bike laying on top the unsuspecting owner; I imagine this IS NOT mentioned in your owner’s manual.
 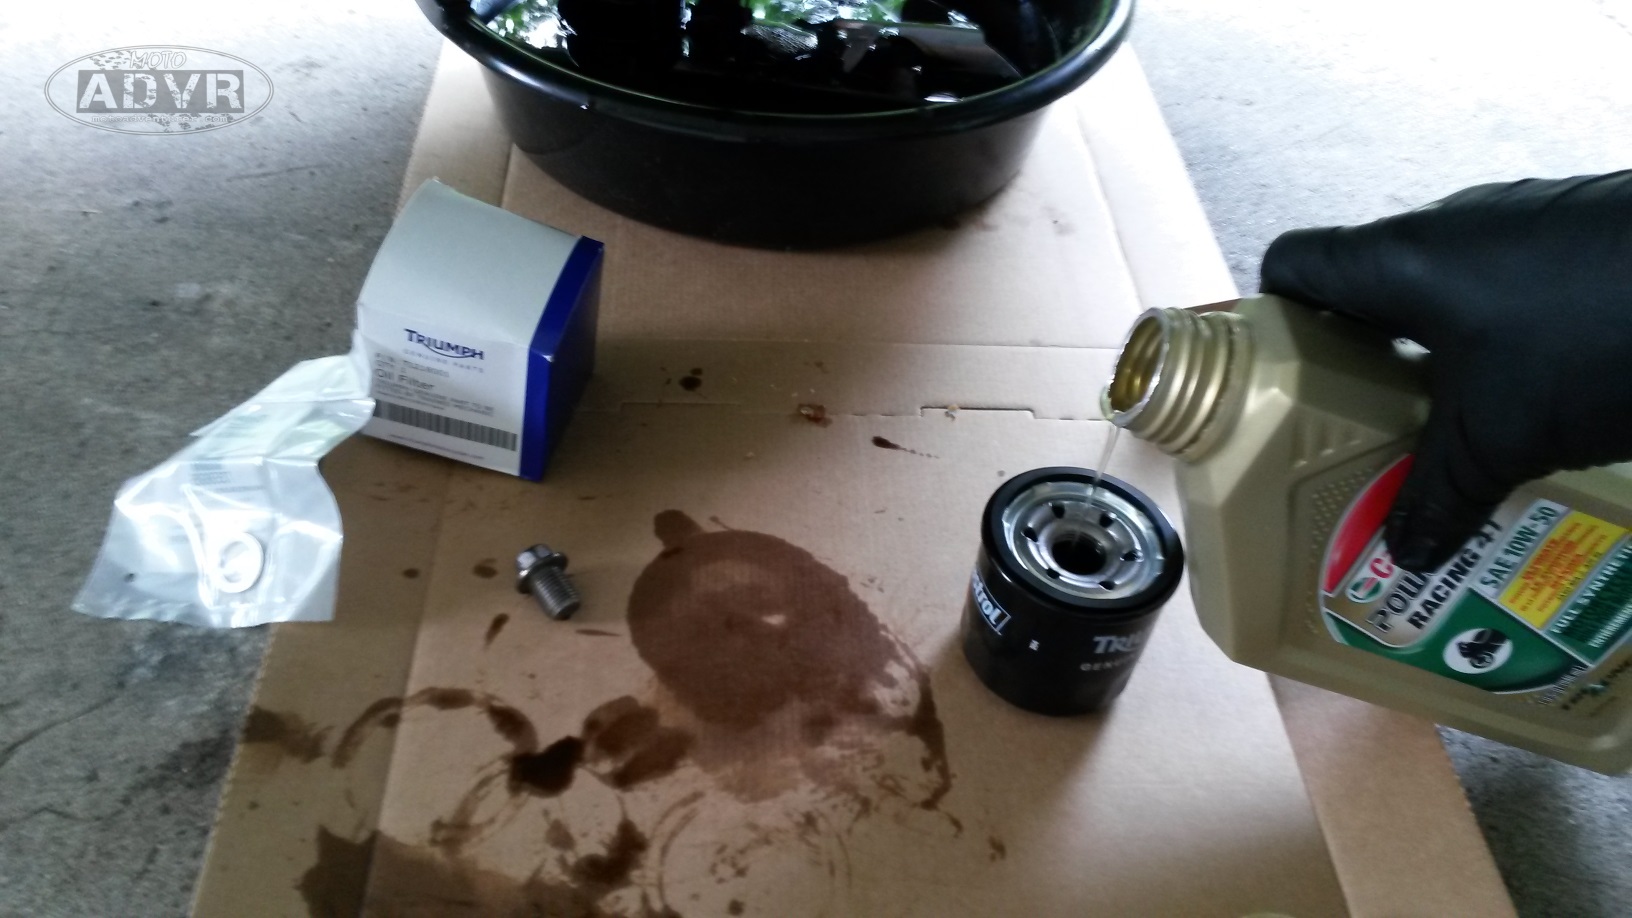 I snapped open the first quart of oil and pre-filled the new filter while the last of the old oil drained from the bike.
 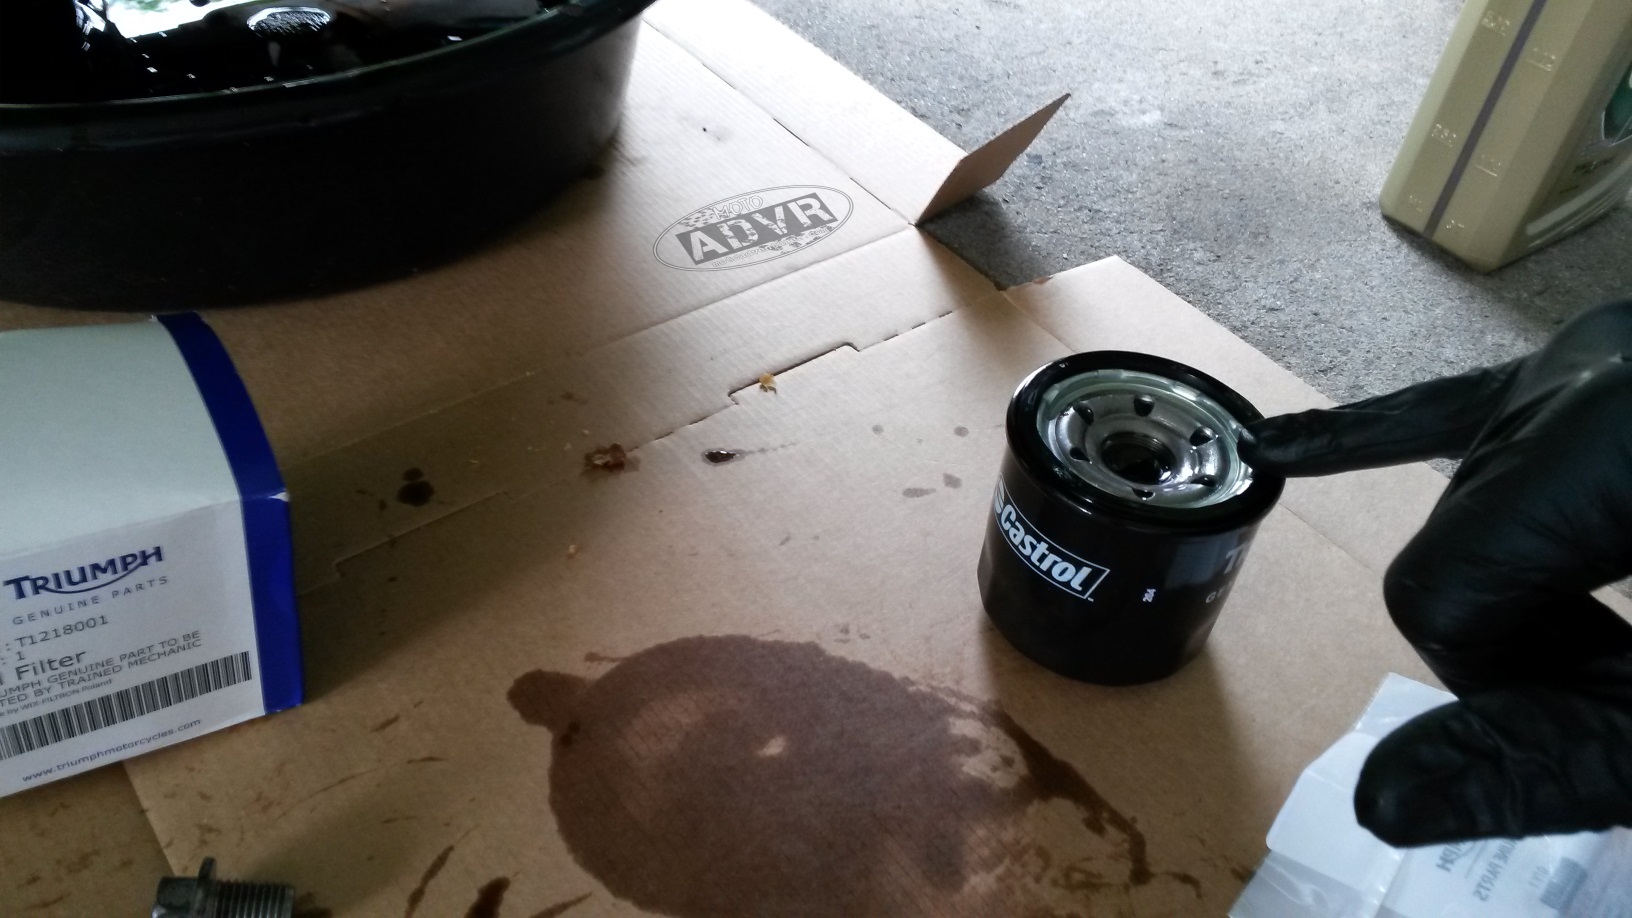 I also smeared a little dab of oil on the O-ring on top the filter to make sure the filter slides into place without binding and tearing the rubber seal. Triumph sells a new washer to go with the drain plug, and recommends you change it with each service. Lots of guys have told me they re-use the old one, but since it’s only a dollar, I splurge and replace it anyway.
  With the oil drained, I replaced the drain plug and delicately twisted the new filter on. Another advantage to that filter wrench is that I can properly torque the new filter. I
 realize some guys twist on the new filter until it seats, then twist another 45-90 degrees, but in this case, I’ll stick to the manual thanks. After installing the new filter, I placed the new washer over the drain plug and re-installed the plug; again sticking to torque spec.
  With the bottom half of the engine plugged, I removed the oil fill cap. On these “modern classics” the filler cap has a slot cut in it for the world’s largest flat-head screwdriver. Admittedly, it looks sharp, but functionally it’s a pain in the ass to remove and reinstall without damaging the chrome. I took a tip off a message board and started using a quarter
 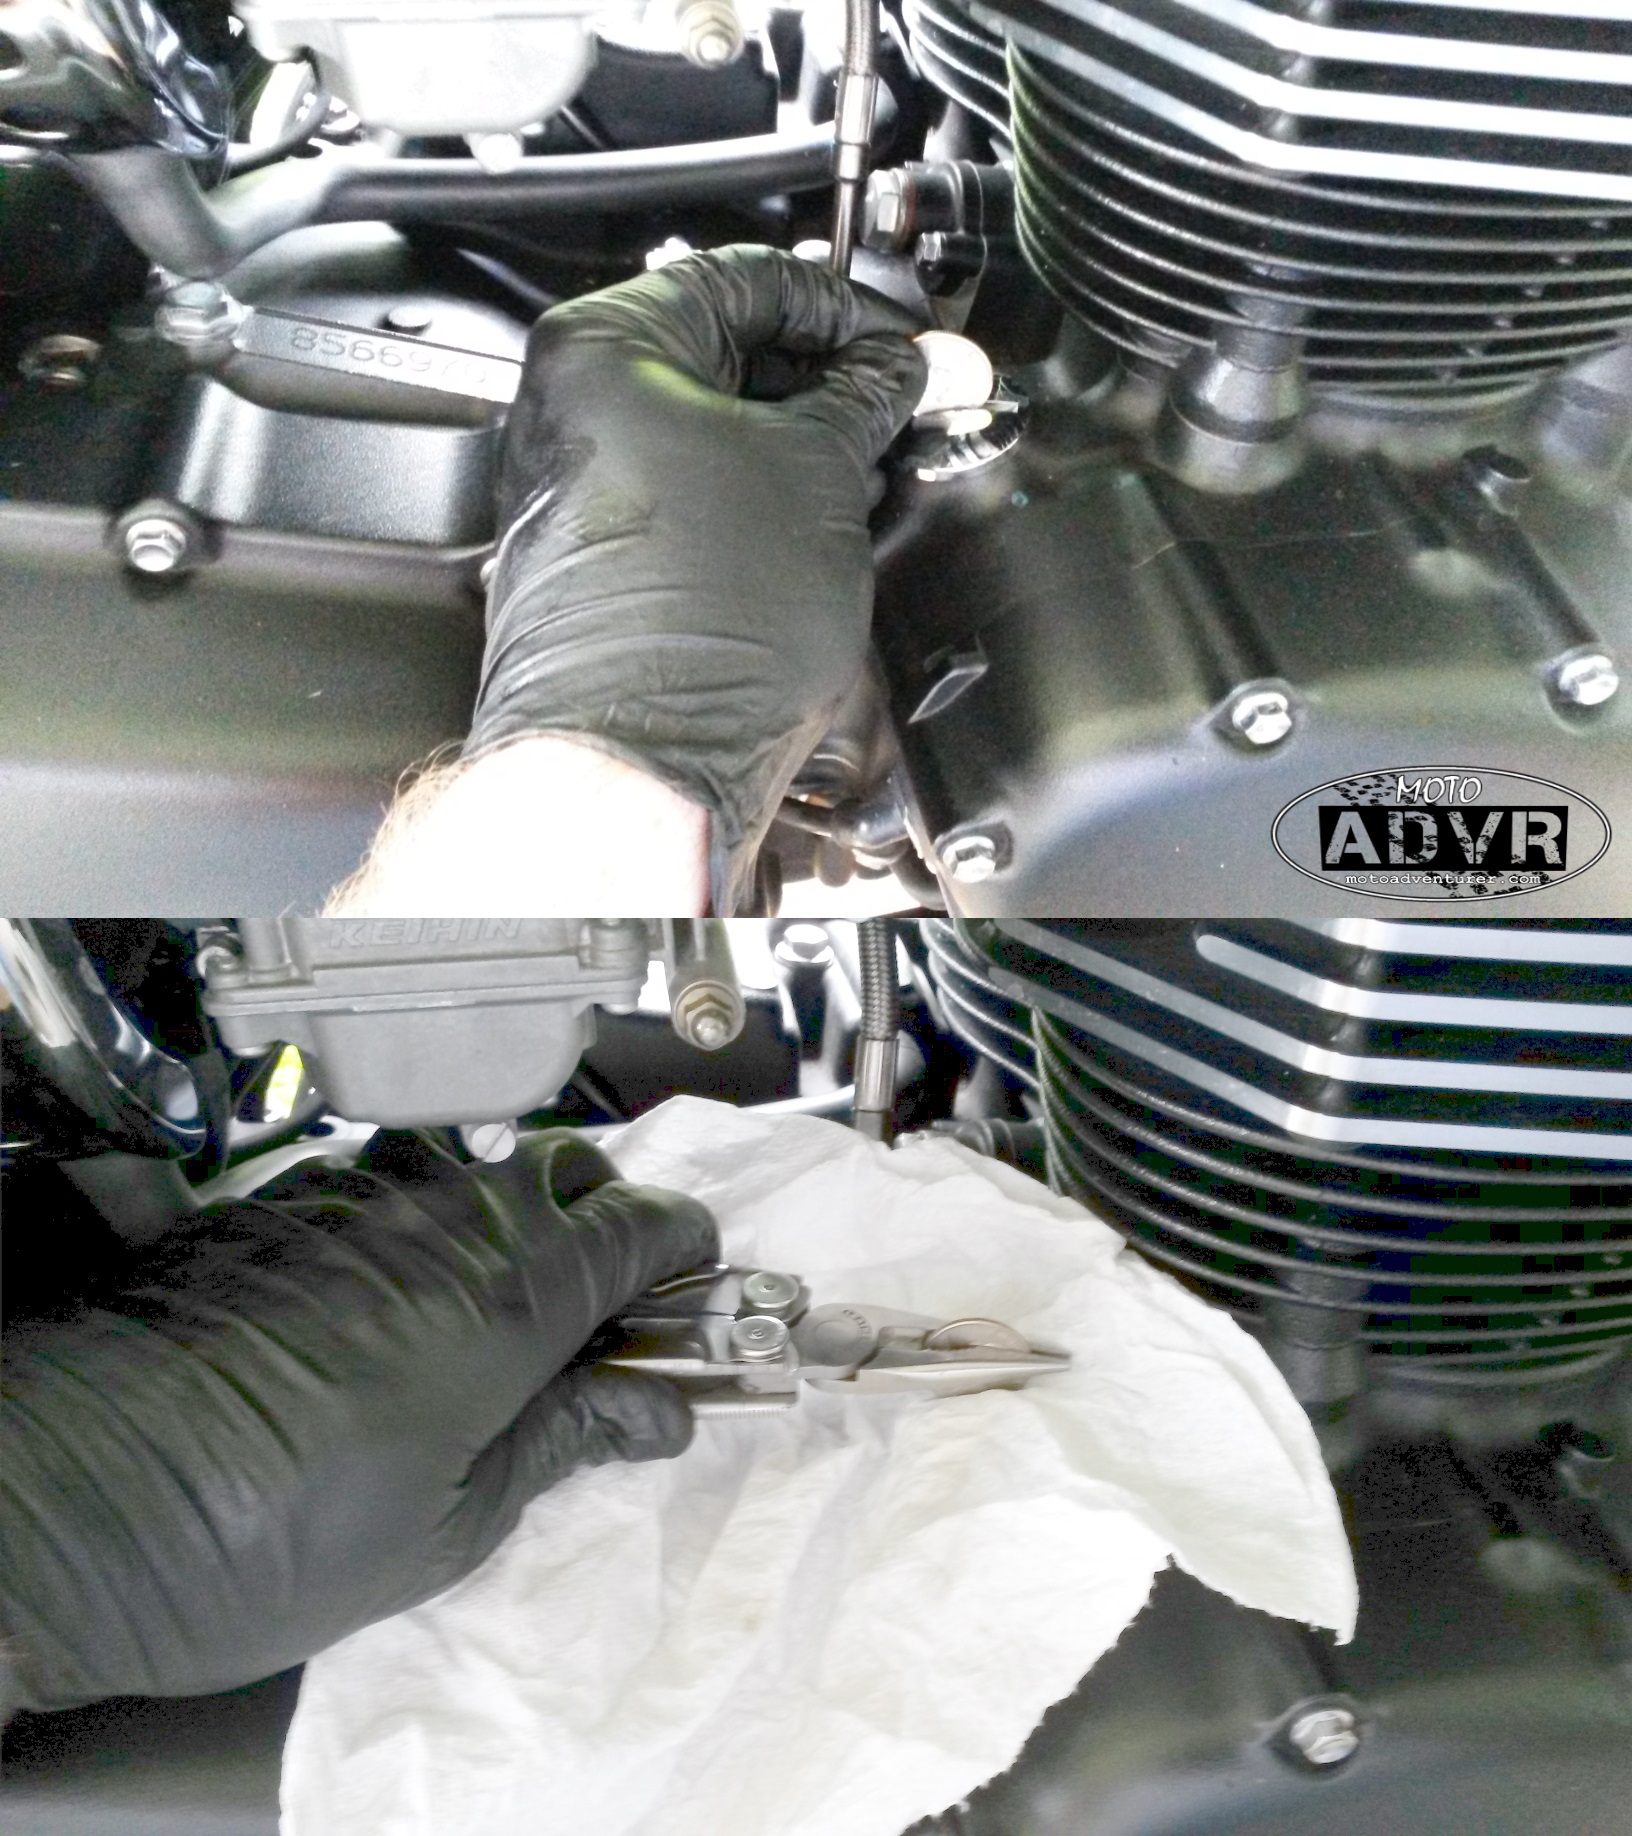 wrapped in a paper towel and just twist it on and off with my Leatherman multi-tool. With the oil cap removed I inserted my trusty funnel and dumped about three quarts of Castrol synthetic into the engine case. The last few oil changes I’ve done have been pretty close to full capacity; this time I tried to save a little more space. When the oil level is filled to the top, the engine tends to spit a little oil past the rings when you really get on the
  throttle, especially when it’s cold (so I’m told); this makes for mess on the breather tubes by the swing-arm, which is really aggravating to clean. Regardless of preference, it’s still easier to add more oil than it is to drain excess oil, so I take my time.
 With the oil change done, I moved on to adjusting the chain. I removed the drive sprocket cover so I could get better access to the chain and the swing arm bolt. I loosened the rear axle bolts in order to adjust the chain tension;
  for typical chain adjustment it’s really not necessary to remove the drive sprocket cover, but since I managed to bend one of my chain adjusters, the notches aren’t even so I have to measure the axle distance the old fashioned way.
 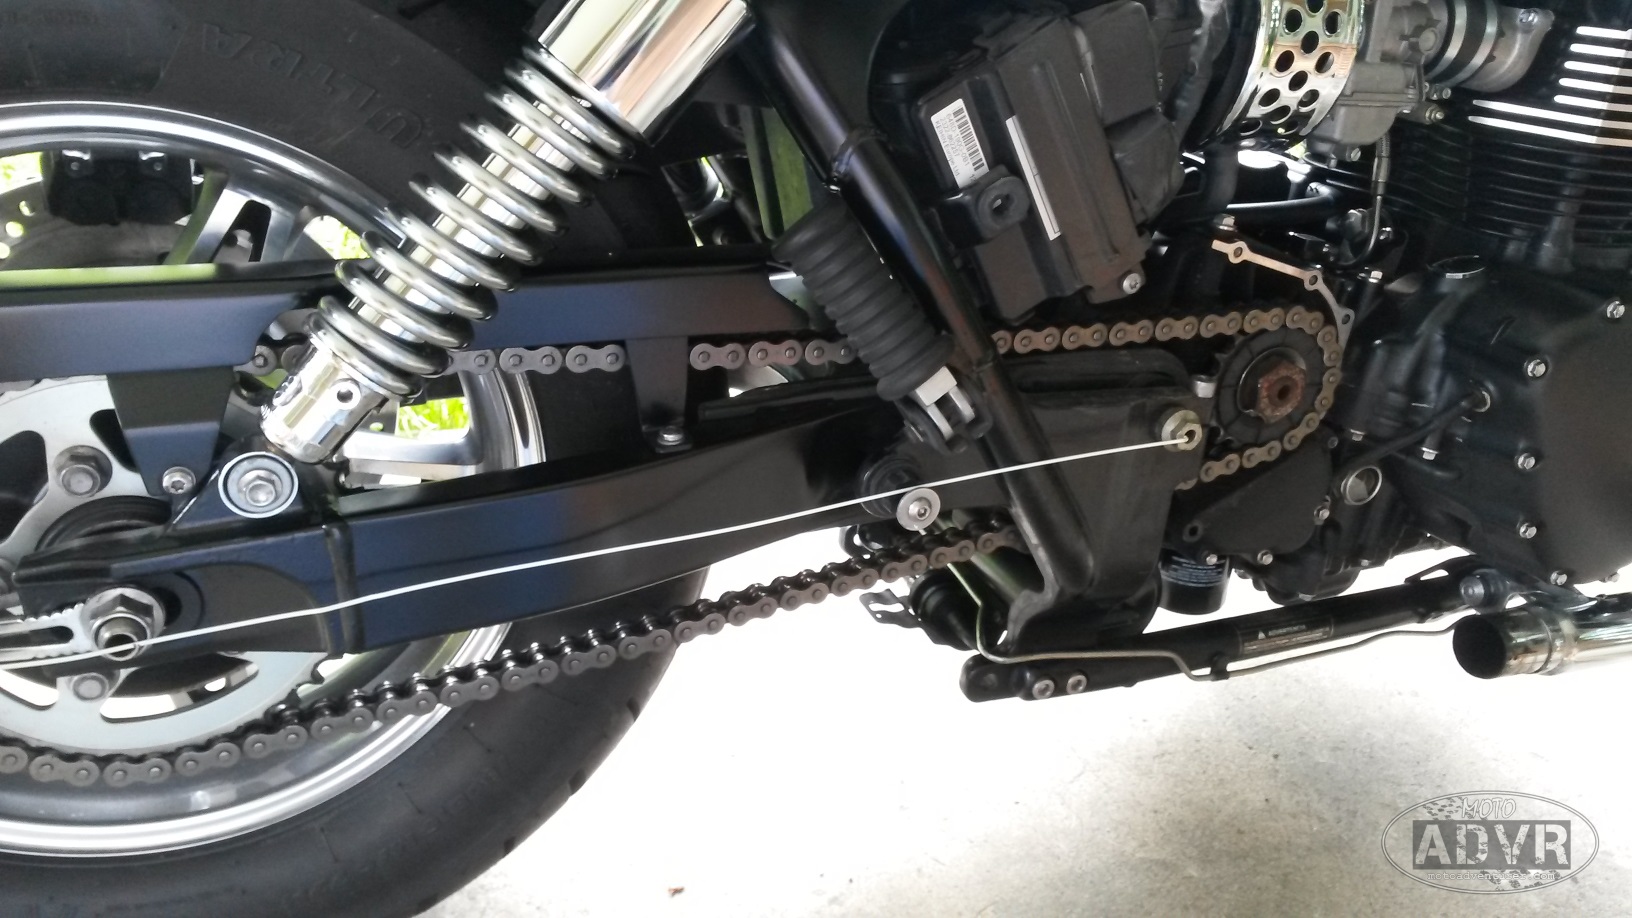 A while back I straightened a piece of coat hanger so I could accurately measure the distance from the swing arm bolt to the rear axle. I tightened the chain adjusters until the chain was within tolerance, measured both sides, then tightened the rear axle to spec.
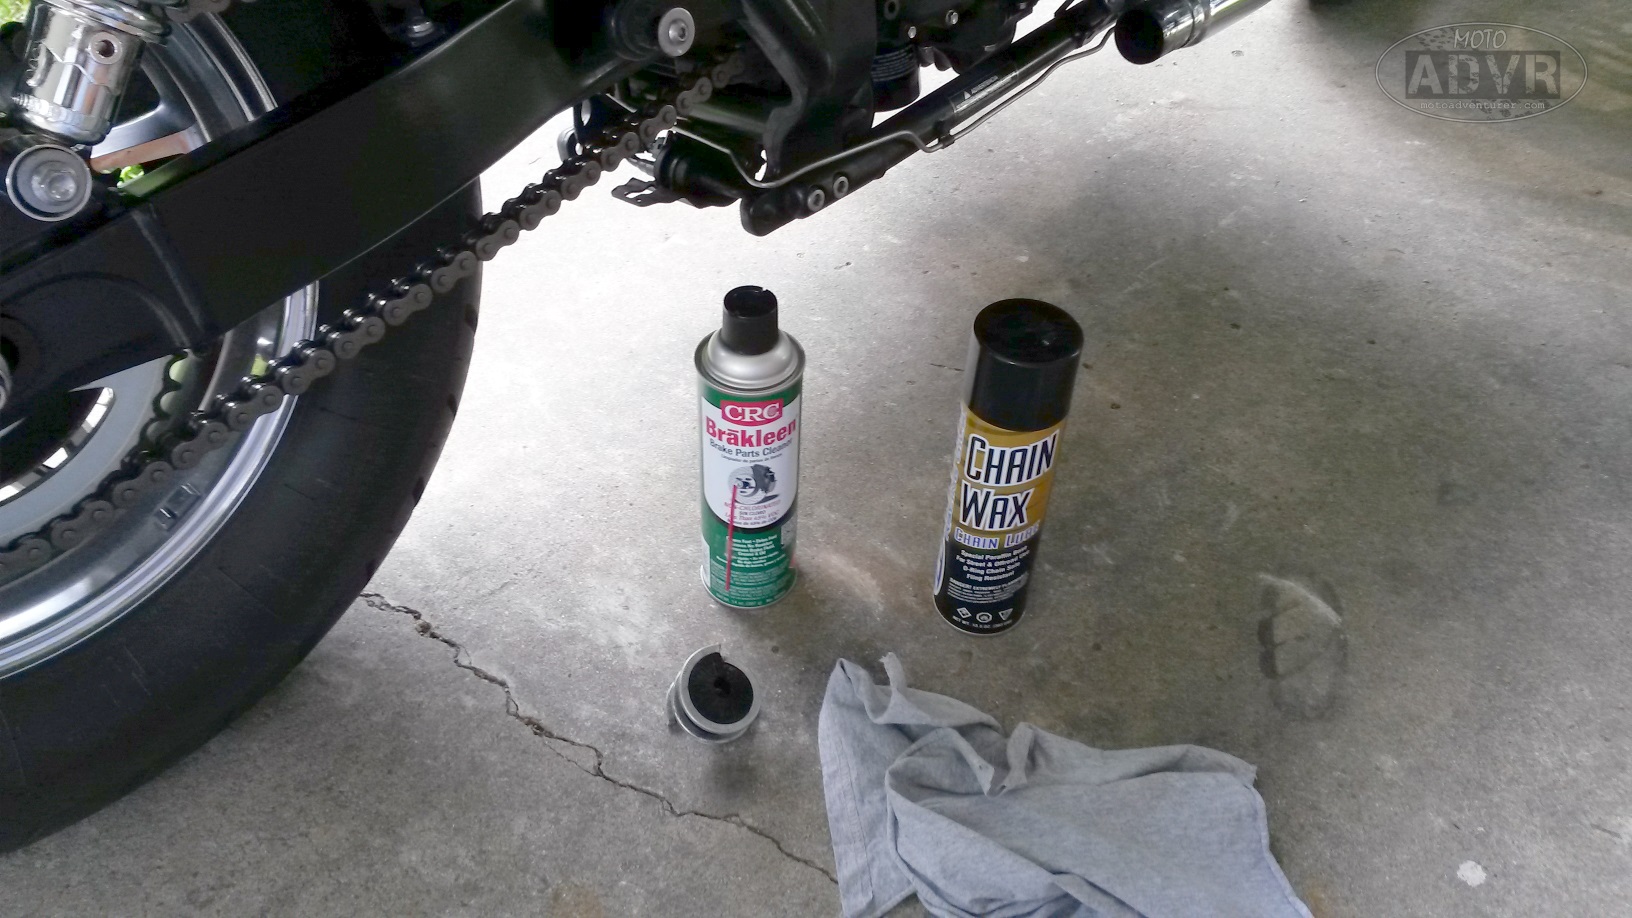 A lot of guys talk about what a hassle chain drives are; I admit they’re a little maintenance intensive compared to shaft and belt, but I imagine they’re nothing like they used to be. Moreover, with a bit of practice it’s maybe a 20 minute operation to properly lubricate a chain. I suppose we can ignore the emphasis on “properly” as I typically spray some brake cleaner on a rag and wipe down the greasy chain. I may have mentioned in my previous post about installing the new chain, but I pretty exclusively use chain wax on my x-ring chain. Chain wax doesn’t hold much dirt, doesn’t sling all over the bike, and wipes off easily.
  I also bought a five dollar spiral chain brush from my local Triumph dealer a while back; I highly recommend getting one, it really makes the job easier.
  From here it was basically running the brush along the chain, wiping it down with a rag (sprayed with brake cleaner), and moving the bike backward until the entire chain is clean (this is a million time easier with a jack or center-stand). Once the chain is dirt and debris free,
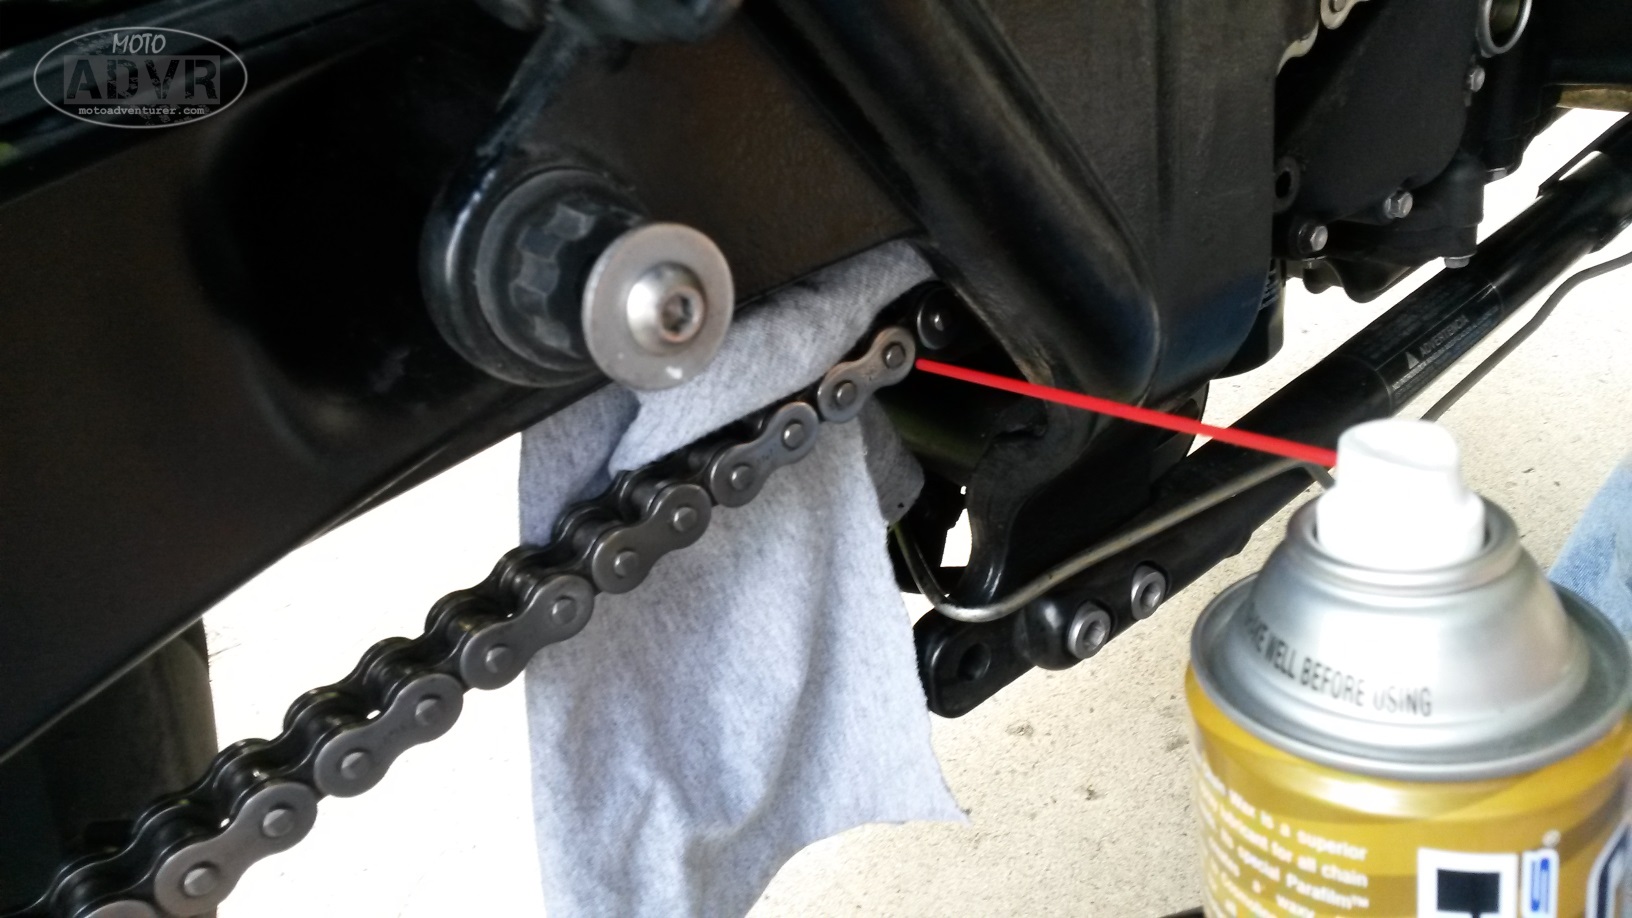 I held a rag behind the chain and sprayed each link with chain wax. This is another one of those moments where the manual will tell you to lubricate the chain while it’s warm; again, in this case a flaming hot exhaust pipe would be in my way and pose a serious skin hazard, thus I do it my way.
  Spraying each link may seem tedious, but thus far it’s paid off; my old chain still looks pretty decent despite being worn out (if aesthetics are important to you), and you’ll notice if you’re developing a rusty link or have blown a ring seal like I did earlier this year.
For 30,000 mile service, oil and chain are pretty much the heavy hitters, and easy do-it-yourself tasks; everything else is pretty much adjusting cable tensions, topping off fluids, and checking for free unobstructed motion. Once complete, and all the covers and whatnot are back on the bike, I typically take it for a test ride. Once the engine is good and hot I have my beautiful wife hold the bike level while I check the oil level sight glass. I’m still on the fence about whether or not I want to mess with removing the head cover and cams to adjust the valves in six thousand more miles. If I do, you’re sure to hear all about it, along with me cussing about the time my bike spent on the jack and off the road.
Do you do your own maintenance? If so, at what point do you finally drop it off at a shop, if ever?

I’ve got a BMW F800GS with 20k miles on it. I have done all my own maintenance so far (oil, brake fluid, new chain/sprockets, air filter) , but I paid the dealer to change the coolant. At 12k I did a valve inspection myself, and luckily everything was within tolerance. After going through that crazy German mechanical riddle, I decided that the 24k valve inspection would be best done by the dealership. The only other item I have someone do is mount new tires onto the wheels I pull off. I do have a garage, and own 5 bikes, so I am a proficient mechanic and enjoy wrenching. http://www.lifebehindbarsmoto.com
LikeLike
Agreed, thus far valves is where I may draw the line on do it yourself maintenence. I enjoy wrenching to some degree, it definitely gives you a feeling of confidence and satisfaction. Thanks for reading!
LikeLike
You should invest in a tire chock. That way the bike sits up straight and it takes up less space than a lift. I have both in you would like to check them out. Also I am getting the tire roller soon, which will make lubing the chain a simpler and faster task also. I’ll let you borrow it when I get it. Ordered some other items which are backordered. Figures.
LikeLike
I’ll have to check that it some time Paul. If things go as planned I’ll have a center stand on the next bike and most of these issues will be gone. Thanks for reading sir!
LikeLike
I’m probably in the minority here, but all the service work on my Honda ST1300 is done by my dealer. I have built a solid relationship with them over the last 17 years, and they roll out the red carpet when I bring my bikes in. They have yet to let me down, and it gives me peace of mind that my bike is operating top notch when I’m on a road trip.
LikeLiked by 1 person
Believe it or not Bob that’s actually refreshing to hear. While I’m somewhere between “I do my maintenance because I like to” and “I’m cheap”, a lot of guys I know struggle to find a reliable shop. It’s good to hear they’re still out there! Thanks for reading!
LikeLike
Pingback: Motorcycle Maintenance: Routine Chain Lubrication | Moto Adventurer
Pingback: Motorcycle Maintenance: Valve Adjustment with 42k service | Moto Adventurer