
The past few weeks I’ve been putting several rides together for the different groups I hang out with. The other day it dawned on me that I could really use a rally roadbook reader. 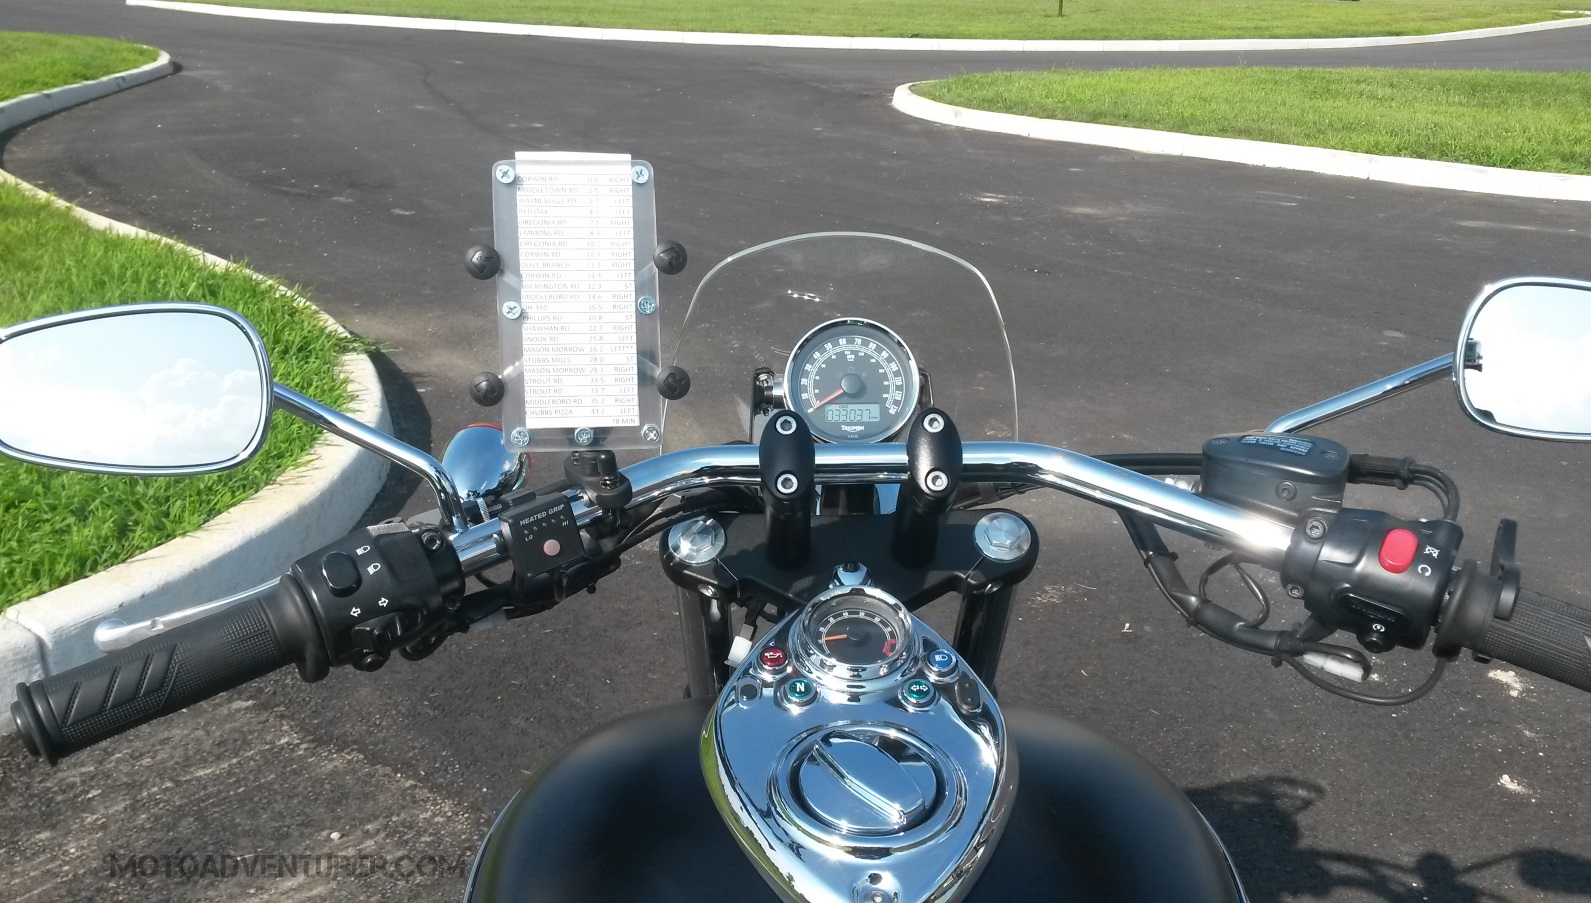 What’s a roadbook reader you ask? I imagine many of you are familiar with the Baja 1000, or the Dakar Rally (no longer run between Paris and Dakar, but that’s a different topic). Many such “rally” races are run without modern GPS devices, just a map, a compass, and a trip odometer. Don’t let me fool you, a roadbook reader is more advanced than directions and a trip odometer, but it’s essentially a list of directions written on a long strip of paper than can be scrolled up and down while riding (more on that here). While I admit I would, someday, feasibly pay to compete in the Alcan 5000 rally (no, not on this bike…), I’m currently in no condition to need a true $500+ Rally Roadbook Reader. Most of the rides I put together are under 4 hours of riding time, and typically not more than 200 miles. That being said, turn by turn directions are pretty critical, considering I’m trying to link together as many of the twisties as I can find between the starting point, and whatever lunch destination I can find.
Several of my friends have suggested I just download an app or purchase a GPS unit. This is probably a very reasonable plan for some riders, however I have a couple objections; for one, I’m cheap! I understand that motorcycle GPS units are better designed to handle the unique weather conditions motorcyclists experience, but the premium over standard GPS units is steep enough to keep me from spending the cash. At the same time I am concerned about the waypoint limitations of affordable GPS units, it’s not unheard of for me to have 15-20 major turns in a one hour stretch of riding, I’m not sure if I can store that many waypoints (admittedly I’ve not done a much research). I have in the past used my phone as a GPS unit, but typically only when I’m taking the fastest route available. The downside to using my phone, even if I did purchase a waypoint application, is that I like to ride in places that don’t get cellular service. Folks have said that their phone GPS still works even if they don’t have cell service; I’ve not always been so lucky. Moreover if you’re wandering around the backwoods of eastern Kentucky, GPS isn’t very reliable.
 So, what do I normally do? I surf Google maps, write down turn-by-turn directions, including mileage, stick it on my tank bag, reset my trip odometer at each stop, and just turn when the mileage matches the roadway. Mind you, I don’t have the world’s best tank bag, but either way, I find myself looking down to check directions, and I really don’t like taking my eyes of the road for that long.
Obviously neither alternative is currently working so well for me, so I need a more “advanced” solution.  While surfing the web I was impressed that there are actually two “affordable” mini-roadmap readers (Touratech and Moose racing), however I still wanted to branch out on my own and make something. My good buddy Jeff reminded me that I have a way with acrylic; it seemed to make sense that I could cut out a couple pieces, put my directions inside, screw them together, then use the RAM mount on my handlebars. The lightbulb immediately went off and I hit the drawing board.
 You’ve probably seen photos of my RAM X-grip by now. The X-grip has been really handy when I do use my phone as a GPS, especially on long trips. I try to avoid messing with the screen while riding, but it has made taking photos from the roadside really easy. At any rate, the X-grip has a maximum opening that isn’t far from my cell phone overall dimensions. I got on the RAM website and looked up the max dimensions to make sure my new navigational contraption would fit. This is obviously the prototype, so I stuck to the K.I.S.S. principle, modeling this “reader” after my phone.
After a few minutes on the band saw, the belt sander, and the drill press, I had a good prototype shell in hand.  I had the acrylic lying around from scraps left in the trash at the office, so at this point I was only out the cost of my lunch break. The scrap pieces of acrylic aren’t pristine by any means, but still clear enough I can read through them from three feet away. After spending $2 at the hardware store I was ready for final assembly. I was actually disappointed in the bolt options available off-the-shelf at the big box store; typically I like to use Allen wrench cap screws, however I wasn’t able to find the sizes I needed to fit the holes (I copied the same hole sizes from my flyscreen). So, using traditional Philips screws, I needed to countersink the mounting holes on the top side. This is much easier to do in the shop than your kitchen; when working with acrylic, speed is typically your friend, but it’s easier said than done (the drill bit grabbed the acrylic… it was almost over right there…). In any case, I placed a skinny washer between each piece of acrylic, tightened down the bolts, and inserted a test piece of paper. The fit was a little snug, but it was right where I wanted it.
I couple concerns I had initially were length of the unit, and whether or not the wind would pull my precious directions out of the reader. I modified a few of the Excel files I’d saved from previous routes and shrunk them to fit in the reader; as it turns out, even the longer legs fit inside, and I can still read the directions quite clearly. To test my second fear I rode to work on the freeway with my draft directions in place; the wind wasn’t successful in stealing my route card.
I have a short ride planned this weekend, so this will be the first real test for my “Old-fashioned” Navigation System, but the gears are already turning for the next generation. Given more time and better tools,  I could feasibly see myself splurging on a new RAM Mount ball to mount to the back of the reader. This would permit me to put larger, longer directions up on the bars (they make an iPad mount… but that’s just ridiculous!). My buddy Jeff had even suggested that I may want to look into mounting an LED strip along the sides, that way I could even navigate at night if needed. Lastly, while that Moose Racing kit is pretty cheap, I’m going to investigate ways to mount a scrolling system of some kind. While as of today, all of my route sheets are short enough to fit in the reader, I imagine a long route from Dayton to Deals Gap might be significant enough to splurge on a long route sheet.
Long term I imagine I will finally break down and purchase a high-end motorcycle GPS unit, but in the meantime, this is probably the best solution at hand. How do you navigate your more complicated routes?

I use the map case on my tankbag for paper cue sheets but my bike-specific Garmin Nuvi 550 is glove-touch friendly and water-resistant. Lack of Bluetooth keeps the price low for a GPS.
LikeLike
Good tip! I’ll look into that (lack of bluetooth)! Water resistant is definitely the plus to the expensive motorcycle GPS units; but sometime good packing tape and paper also works!
LikeLike
Sometimes simple is better! No need to rely on GPS signal or cell reception.
LikeLike
I’m telling you, you should have seen the looks of people’s faces when I said that GPS doesn’t work in some of the places I ride…
LikeLike
On my latest trip I used a map I printed out and tried to stuff it in my tank bag window. Damn thing was so hard to get in. Then I got kind of lost and had to turn on my GPS and it made me back track 25 miles. I made it to where I was headed. I could have done this with just a map but it was nice to be able to flip on the GPS and take a look.
LikeLiked by 1 person
True story Steve. I tend to do a considerable amount of pre riding and or route recon on google before a big ride; but sometimes just wandering and having a gps to get you out of a jam is better.
LikeLike
I block print turn by turn on a paper and use the window on my tank bag AND a GPS. I need all the help I can get but I really like your solution.
LikeLiked by 1 person
I had a feeling I wasn’t the only one!
LikeLike
I write turn by turn directions on post cards, no more than 5 turns per card. I can fit 4 such cards at a time in my tankbag map case. I write them with multi colored felt tip pens, each line a different color so I don’t get confused. After the fourth card I just take a break, rotate cards, drink water and go. I also carry a map of the region I’m in. Works great for me!
LikeLiked by 1 person
No school like the old school, thanks for reading!
LikeLike
Being a little older ( than you, I expect anyway,) back when I started riding motorcycles there were no conveniences like GPS, Bluetooth, or even cell phones, so riders were reliant on the old trusty paper map, or road atlas. I always rode with a tank bag, (apart from when I had a GPz) and always bought one with a clear top to put my notes, directions or small maps. I always got where I was going and never really got upset when I didn’t know exactly where I was, after all all you have to do is go to the next junction or town and look at your map again. Nowadays I have all the flashiest wizardry attached to the bike and my helmet feeds music through a BT headset, and I get directions or make calls whenever I want. It’s a far cry from where I started, and I really appreciate the technology, but I do find myself at odds with it sometimes when…wait for it….I don’t know exactly where I am. You see the problem is the same, but the symtoms are different. On an old style map you had to search for your location, on a new GPS or phone mapping app you have to scro out to see where you are. However, the benefits still outweigh the negatives. Get yourself a good used Garmin Zumo, a 550 if you can. It has all the BT and phone integration anyone could want, and learn to use Basecamp. You se, Basecamp lets you create Trips on your PC that you can sent to the unit via USB. The great part of it is this. If you imagine your Trip as a tree, you can have routes as part of your tree, the branches, if you like, and in each route you can have waypoints, the twigs or fruit of the tree. You can have up to 125 waypoints a route I think, and up to 30 routes a trip, so you can divide your long rides up into routes. I do this on multi day trips, although there’s another function that allows you to that in a different way too. It’s well worth it when you get used to working with it, much better than doing all the work on line and writing it all down afterwards. That’s a bit like marrying a Supermodel so you can look at her swimwear. 🙂
LikeLiked by 1 person
That’s a funny analogy Gerry. I did recently become a new zumo owner, so I’m looking forward to taking advantage of the new tech perks. It may he a few as I need to get the new Scram sorted out the way I want it, but I’m sure touring will get a bit easier in short order! Thanks for the input about base camp!
LikeLike
Pingback: Route Planning: A Petition to Google | Moto Adventurer